
Elysia with Supabase. Your next backend at sonic speed

Supabase, an Open Source alternative to Firebase, has become one of the developers' favorite toolkits known for rapid development.
Featuring PostgreSQL, ready-to-use user authentication, Serverless Edge function, Cloud Storage, and more, ready to use.
Because Supabase already has pre-built and composed the situation where you find yourself redoing the same feature for the 100th time into less than 10 lines of code.
For example, authentication, which would take require you to rewrite a hundred lines of code for every project you did to just:
supabase.auth.signUp(body)

supabase.auth.signInWithPassword(body)
Then Supabase will handle the rest, confirming email by sending a confirmation link, or authentication with a magic link or OTP, securing your database with row-level authentication, you name it.
Things that take many hours to redo in every project are now a matter of a minute to accomplish.
Elysia
If you haven't heard, Elysia is a Bun-first web framework built with speed and Developer Experience in mind.
Elysia outperforms Express by nearly ~20x faster, while having almost the same syntax as Express and Fastify.
(Performance may vary per machine, we recommended you run the benchmark on your machine before deciding the performance)
Elysia has a very snappy Developer Experience. Not only that you can define a single source of truth for type, but also detects and warns when you accidentally create a change in data.
All done in a declaratively small line of code.
Setting things up
You can use Supabase Cloud for a quick start.
Supabase Cloud will handle setting up the database, scaling, and all things you need in the Cloud in a single click.

Creating a project, you should see something like this, fill all the requests you need, and if you're in Asia, Supabase has a server in Singapore and Tokyo
(sometimes this is a tie-breaker for developers living in Asia because of latency)
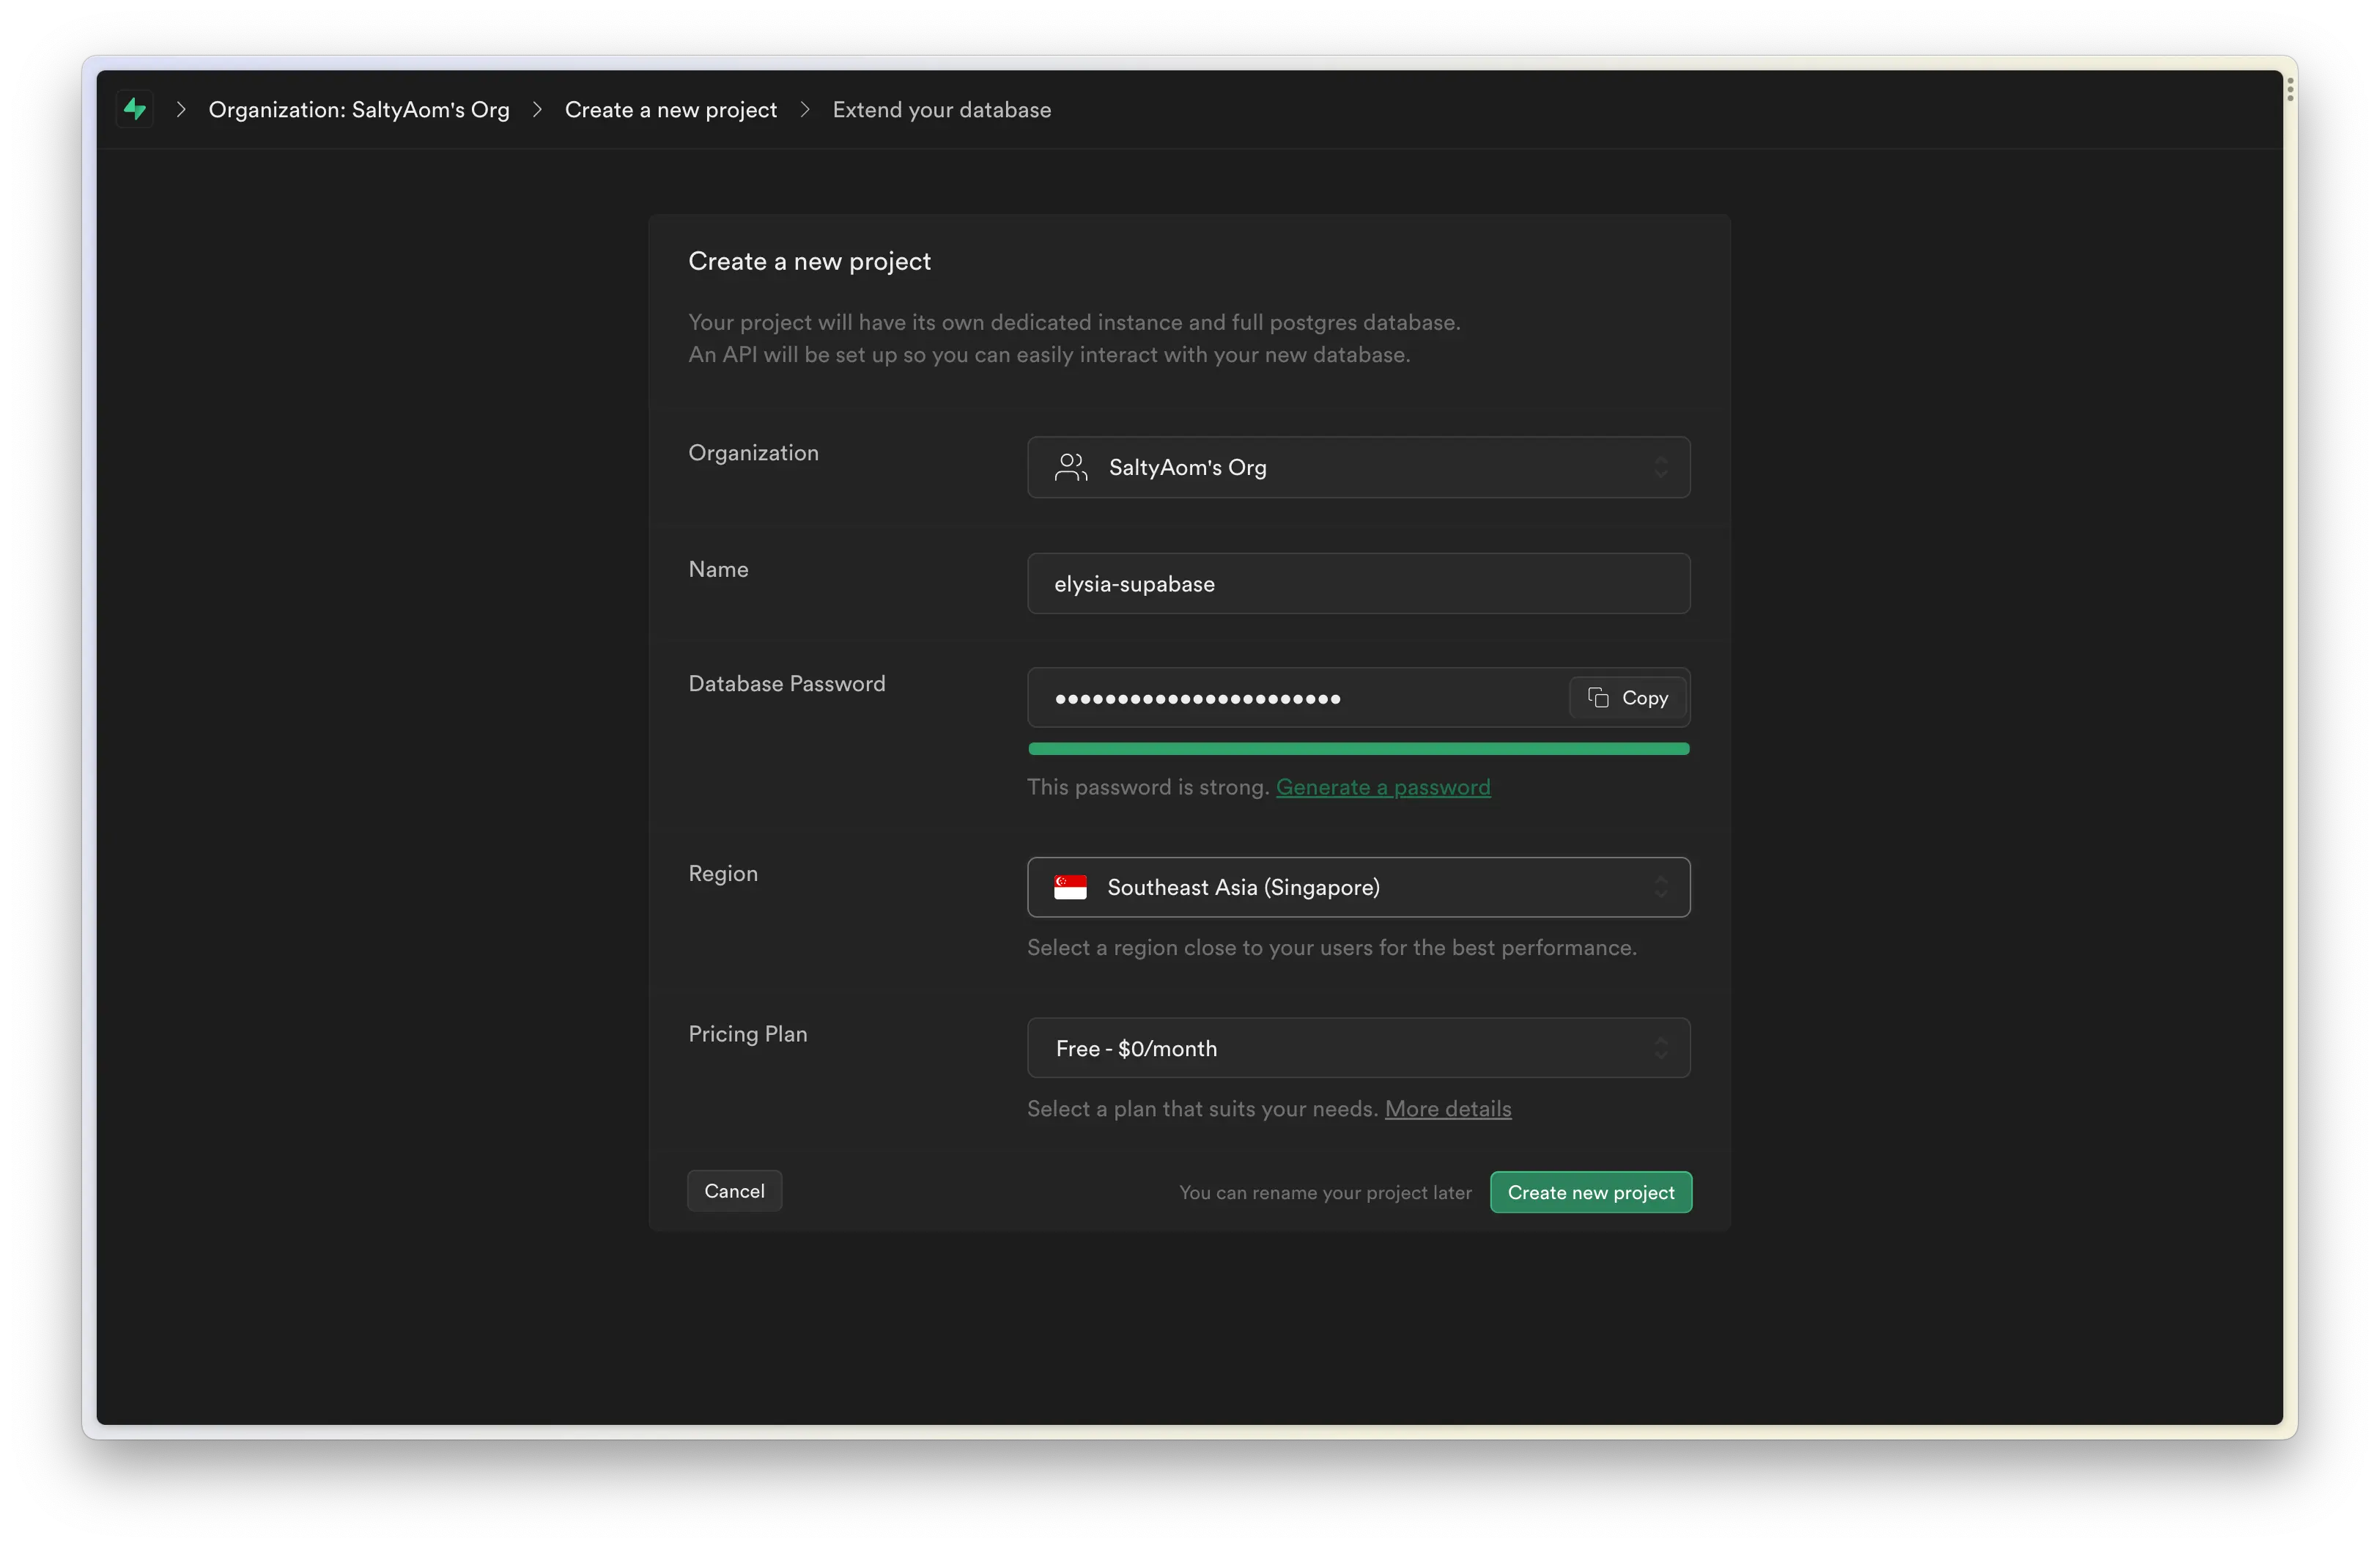
After creating a project, you should greet with a welcome screen where you can copy the project URL and service role.
Both are use to indicate which Supabase project you're using in your project.
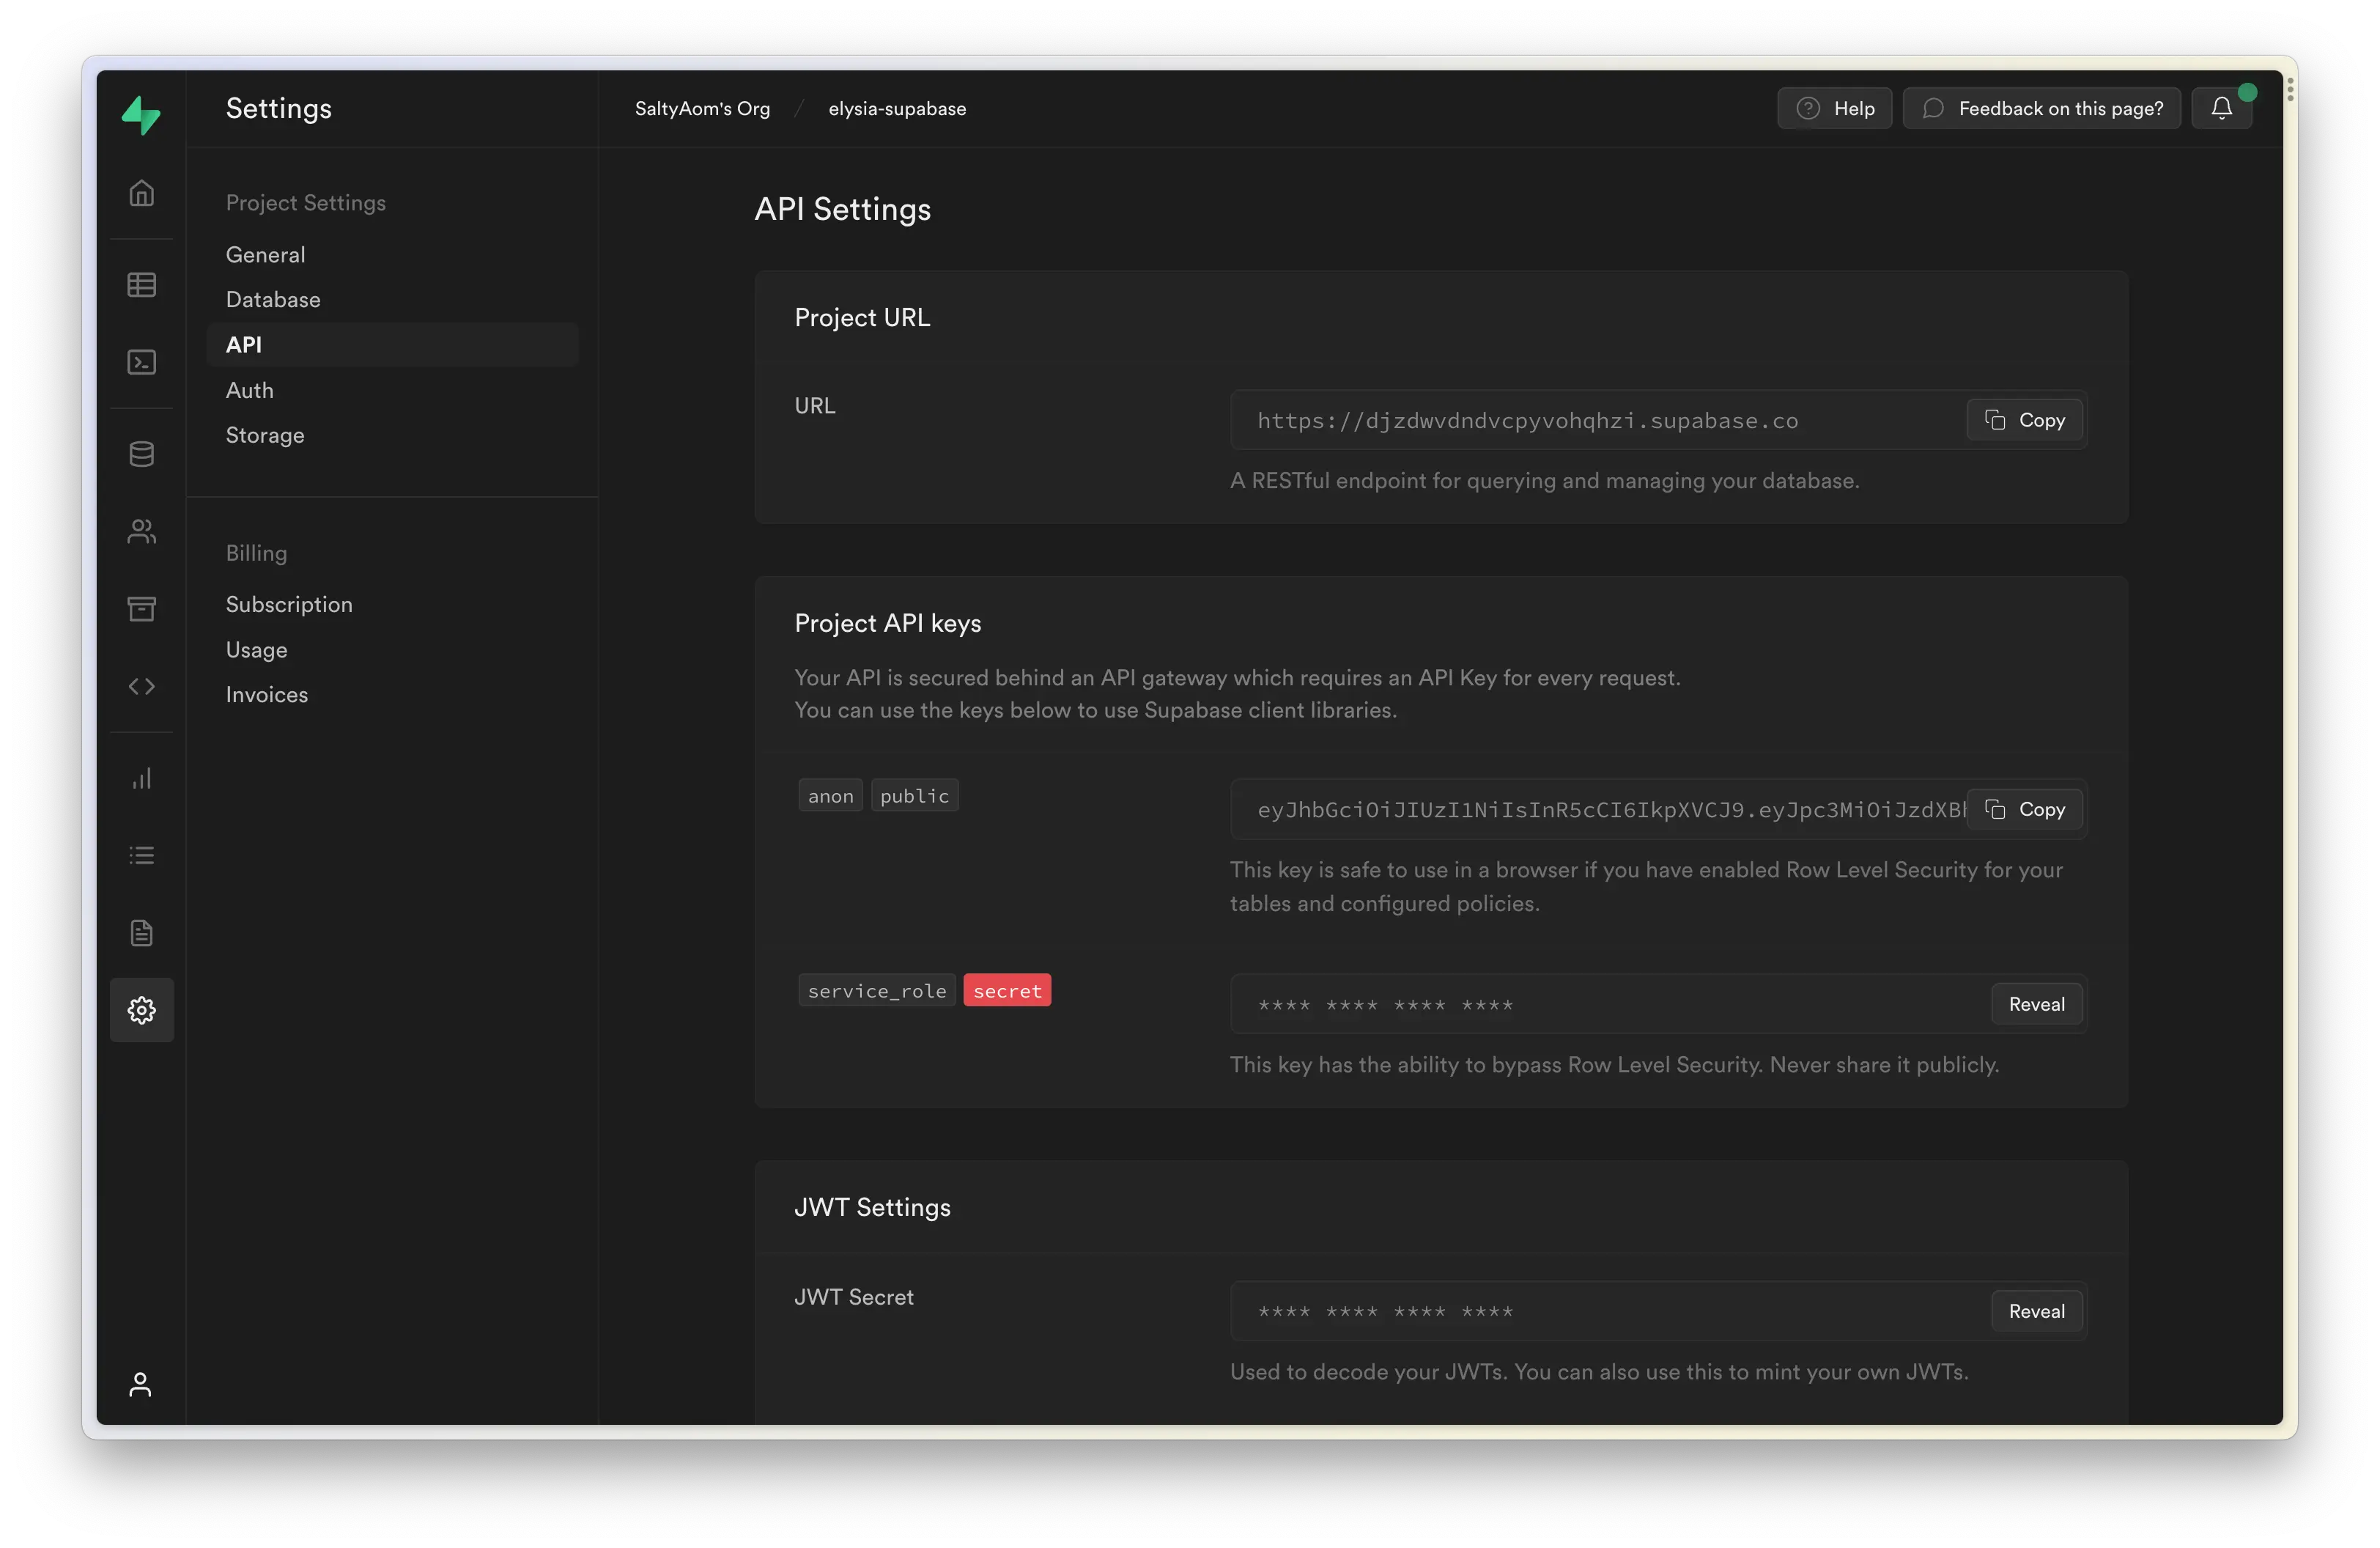
And if you missed the welcome page, you navigate to Settings > API, copy Project URL and Project API keys
Now in your command line, you can start creating the Elysia project by running:
bun create elysia elysia-supabaseThe last argument is our folder name for Bun to create, feel free to change the name to anything you like.
Now, cd into our folder, as we are going to use a newer feature in Elysia 0.3 (RC), we need to install the Elysia RC channel first, and let's grab a cookie plugin and Supabase client that we are going to use later here too.
bun add elysia@rc @elysiajs/cookie@rc @supabase/supabase-jsLet's create a .env file to load our Supabase service load as a secret.
# .env
supabase_url=https://********************.supabase.co
supabase_service_role=**** **** **** ****
You don't have to install any plugin to load the env file as Bun load .env file by default
Now let's open our project in our favorite IDE, and create a file inside src/libs/supabase.ts
// src/libs/supabase.ts
import { createClient } from '@supabase/supabase-js'

const { supabase_url, supabase_service_role } = process.env

export const supabase = createClient(supabase_url!, supabase_service_role!)
And that's it! That's all you need to set up Supabase and a Elysia project.
Now let's dive into implementation!
Authentication
Now let's create authentication routes separated from the main file.
Inside src/modules/authen.ts, let's create an outline for our routes first.
// src/modules/authen.ts
import { Elysia } from 'elysia'

const authen = (app: Elysia) =>
    app.group('/auth', (app) =>
        app
            .post('/sign-up', () => {
                return 'This route is expected to sign up a user'
            })
            .post('/sign-in', () => {
                return 'This route is expected to sign in a user'
            })
    )
And now, let's apply Supabase to authenticate our user.
// src/modules/authen.ts
import { Elysia } from 'elysia'
import { supabase } from '../../libs'

const authen = (app: Elysia) =>
    app.group('/auth', (app) =>
        app
            .post('/sign-up', async ({ body }) => {
                const { data, error } = await supabase.auth.signUp(body)
                if (error) return error

                return data.user
                return 'This route is expected to sign up a user'
            })
            .post('/sign-in', async ({ body }) => {
                const { data, error } = await supabase.auth.signInWithPassword(
                    body
                )
                if (error) return error
                return data.user
                return 'This route is expected to sign in a user'
            })
    )
And- done! That's all it needs to create sign-in and sign-up route for our user.
But we have a little problem here, you see, our route can accept any body and put it into a Supabase parameter, even an invalid one.
So, to make sure that we put the correct data, we can define a schema for our body.
// src/modules/authen.ts
import { Elysia, t } from 'elysia'
import { supabase } from '../../libs'

const authen = (app: Elysia) =>
    app.group('/auth', (app) =>
        app
            .post(
                '/sign-up',
                async ({ body }) => {
                    const { data, error } = await supabase.auth.signUp(body)

                    if (error) return error

                    return data.user
                },
                {
                    schema: {
                        body: t.Object({
                            email: t.String({
                                format: 'email'
                            }),
                            password: t.String({
                                minLength: 8
                            })
                        })
                    }
                }
            )
            .post(
                '/sign-in',
                async ({ body }) => {
                    const { data, error } =
                        await supabase.auth.signInWithPassword(body)

                    if (error) return error

                    return data.user
                },
                {
                    schema: {
                        body: t.Object({
                            email: t.String({
                                format: 'email'
                            }),
                            password: t.String({
                                minLength: 8
                            })
                        })
                    }
                }
            )
    )
And now we declare a schema in both sign-in and sign-up, Elysia is going to make sure that an incoming body is going to have the same form as we declare, preventing an invalid argument from passing into supabase.auth.
Elysia also understands the schema, so instead of declaring TypeScript's type separately, Elysia types the body automatically as the schema you defined.
So if you accidentally create a breaking change in the future, Elysia going to warn you about the data type.
The code we have are great, it did the job that we expected, but we can step it up a little bit further.
You see, both sign-in and sign-up accept the same shape of data, in the future, you might also find yourself duplicating a long schema in multiple routes.
We can fix that by telling Elysia to memorize our schema, then we can use by telling Elysia the name of the schema we want to use.
// src/modules/authen.ts
import { Elysia, t } from 'elysia'
import { supabase } from '../../libs'

const authen = (app: Elysia) =>
    app.group('/auth', (app) =>
        app
            .setModel({
                sign: t.Object({
                    email: t.String({
                        format: 'email'
                    }),
                    password: t.String({
                        minLength: 8
                    })
                })
            })
            .post(
                '/sign-up',
                async ({ body }) => {
                    const { data, error } = await supabase.auth.signUp(body)

                    if (error) return error
                    return data.user
                },
                {
                    schema: {
                        body: 'sign',
                        body: t.Object({
                            email: t.String({
                                format: 'email'
                            }),
                            password: t.String({
                                minLength: 8
                            })
                        })
                    }
                }
            )
            .post(
                '/sign-in',
                async ({ body }) => {
                    const { data, error } =
                        await supabase.auth.signInWithPassword(body)

                    if (error) return error

                    return data.user
                },
                {
                    schema: {
                        body: 'sign',
                        body: t.Object({
                            email: t.String({
                                format: 'email'
                            }),
                            password: t.String({
                                minLength: 8
                            })
                        })
                    }
                }
            )
    )
Great! We have just used name reference on our route!
TIP
If you found yourself with a long schema, you can declare them in a separate file and re-use them in any Elysia route to put the focus back on business logic instead.
Storing user session
Great, now the last thing we need to do to complete the authentication system is to store the user session, after a user is signed in, the token is known as access_token and refresh_token in Supabase.
access_token is a short live JWT access token. Use to authenticate a user in a short amount of time. refresh_token is a one-time-used never-expired token to renew access_token. So as long as we have this token, we can create a new access token to extend our user session.
We can store both values inside a cookie.
Now, some might not like the idea of storing the access token inside a cookie and might use Bearer instead. but for simplicity, we are going to use a cookie here.
TIP
We can set a cookie as HttpOnly to prevent XSS, Secure, Same-Site, and also encrypt a cookie to prevent a man-in-the-middle attack.
// src/modules/authen.ts
import { Elysia, t } from 'elysia'
import { cookie } from '@elysiajs/cookie'

import { supabase } from '../../libs'

const authen = (app: Elysia) =>
    app.group('/auth', (app) =>
        app
            .use(
                cookie({
                    httpOnly: true,
                    // If you need cookie to deliver via https only
                    // secure: true,
                    //
                    // If you need a cookie to be available for same-site only
                    // sameSite: "strict",
                    //
                    // If you want to encrypt a cookie
                    // signed: true,
                    // secret: process.env.COOKIE_SECRET,
                })
            )
            .setModel({
                sign: t.Object({
                    email: t.String({
                        format: 'email'
                    }),
                    password: t.String({
                        minLength: 8
                    })
                })
            })
            // rest of the code
    )
And-- That's all it takes to create a sign-in and sign-up route for Elysia and Supabase!
Refreshing a token
Now, as mentioned, access_token is short-lived, and we might need to renew the token now and then.
Luckily, we can do that with a one-liner from Supabase.
// src/modules/authen.ts
import { Elysia, t } from 'elysia'
import { supabase } from '../../libs'

const authen = (app: Elysia) =>
    app.group('/auth', (app) =>
        app
            .setModel({
                sign: t.Object({
                    email: t.String({
                        format: 'email'
                    }),
                    password: t.String({
                        minLength: 8
                    })
                })
            })
            .post(
                '/sign-up',
                async ({ body }) => {
                    const { data, error } = await supabase.auth.signUp(body)

                    if (error) return error
                    return data.user
                },
                {
                    schema: {
                        body: 'sign'
                    }
                }
            )
            .post(
                '/sign-in',
                async ({ body }) => {
                    const { data, error } =
                        await supabase.auth.signInWithPassword(body)

                    if (error) return error

                    return data.user
                },
                {
                    schema: {
                        body: 'sign'
                    }
                }
            )
            .get(
                '/refresh',
                async ({ setCookie, cookie: { refresh_token } }) => {
                    const { data, error } = await supabase.auth.refreshSession({
                        refresh_token
                    })
                    if (error) return error
                    setCookie('refresh_token', data.session!.refresh_token)
                    return data.user
                }
            )
    )
Finally, add routes to the main server.
import { Elysia, t } from 'elysia'

import { auth } from './modules'

const app = new Elysia()
    .use(auth)
    .listen(3000)

console.log(
    `🦊 Elysia is running at ${app.server?.hostname}:${app.server?.port}`
)
And that's it!
Authorization route
We have just implemented user authentication which is fun and game, but now you might find yourself in need of authorization for each route, and duplicating the same code to check for cookies all over the place.
Luckily, we can re-use the function in Elysia.
Let's paint the example by saying that we might want a user to create a simple blog post that can have the database schema as the following:
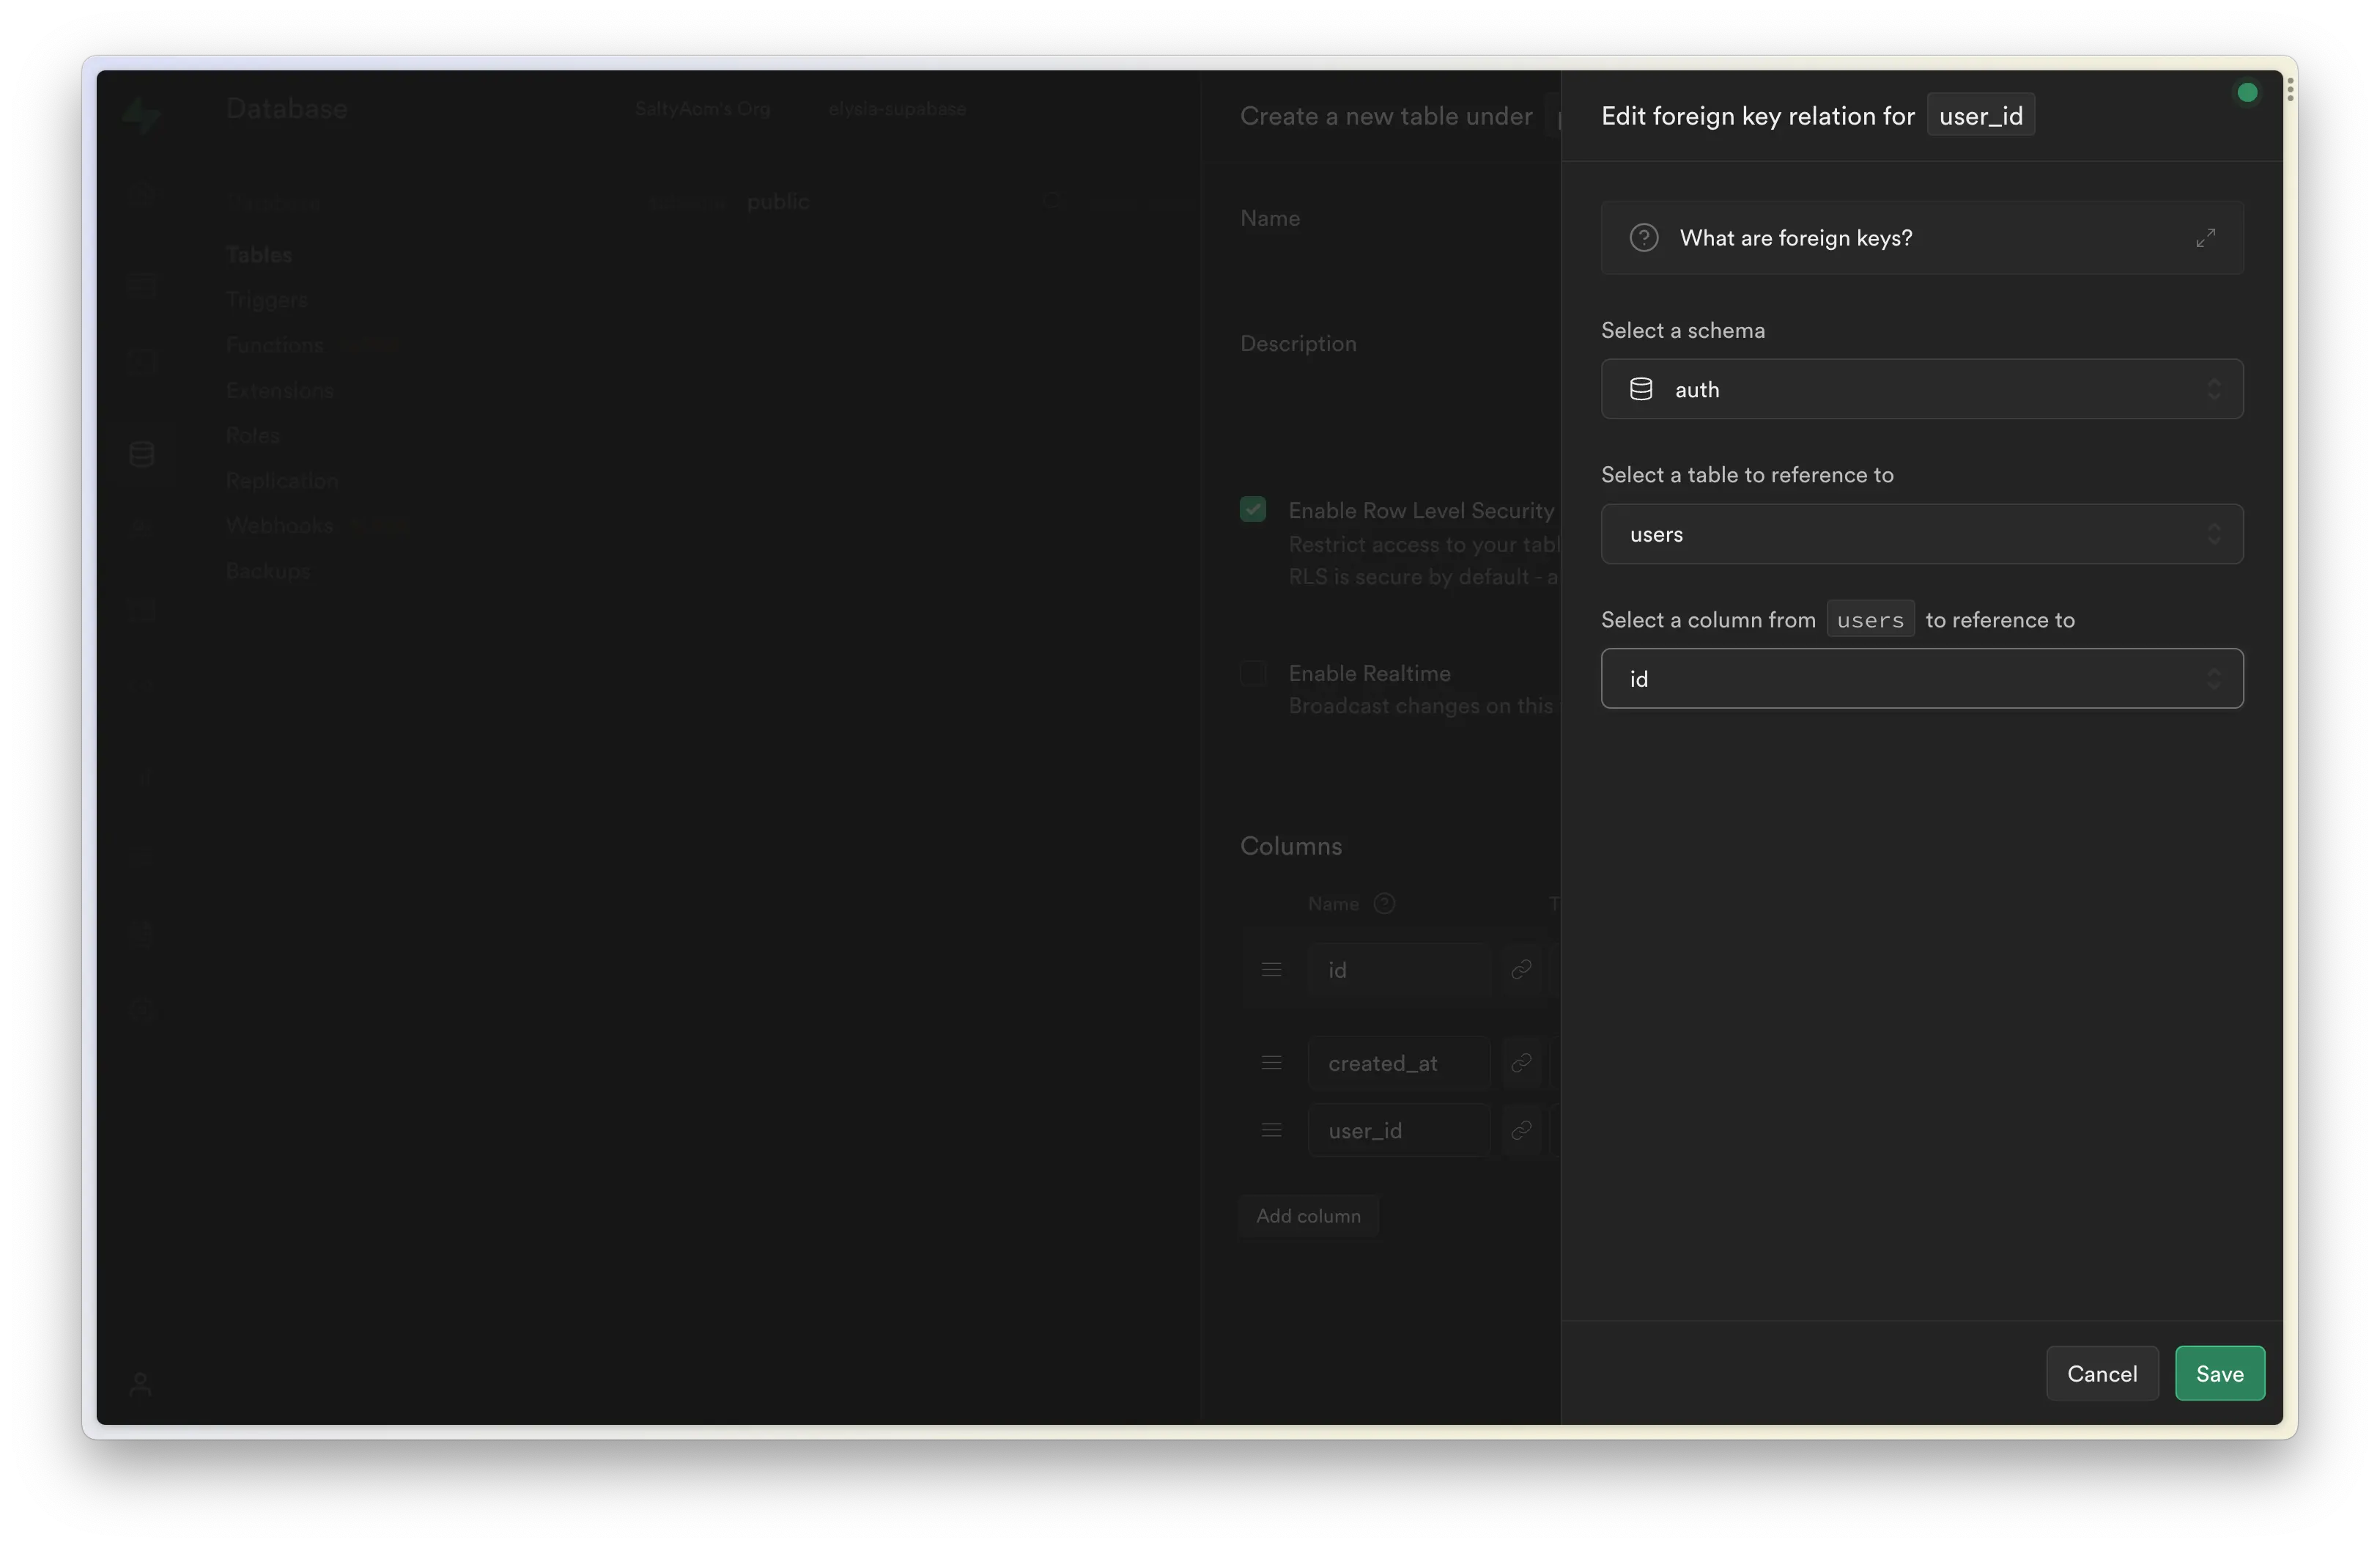
Inside the Supabse console, we are going to create a Postgres table name 'post' as the following: 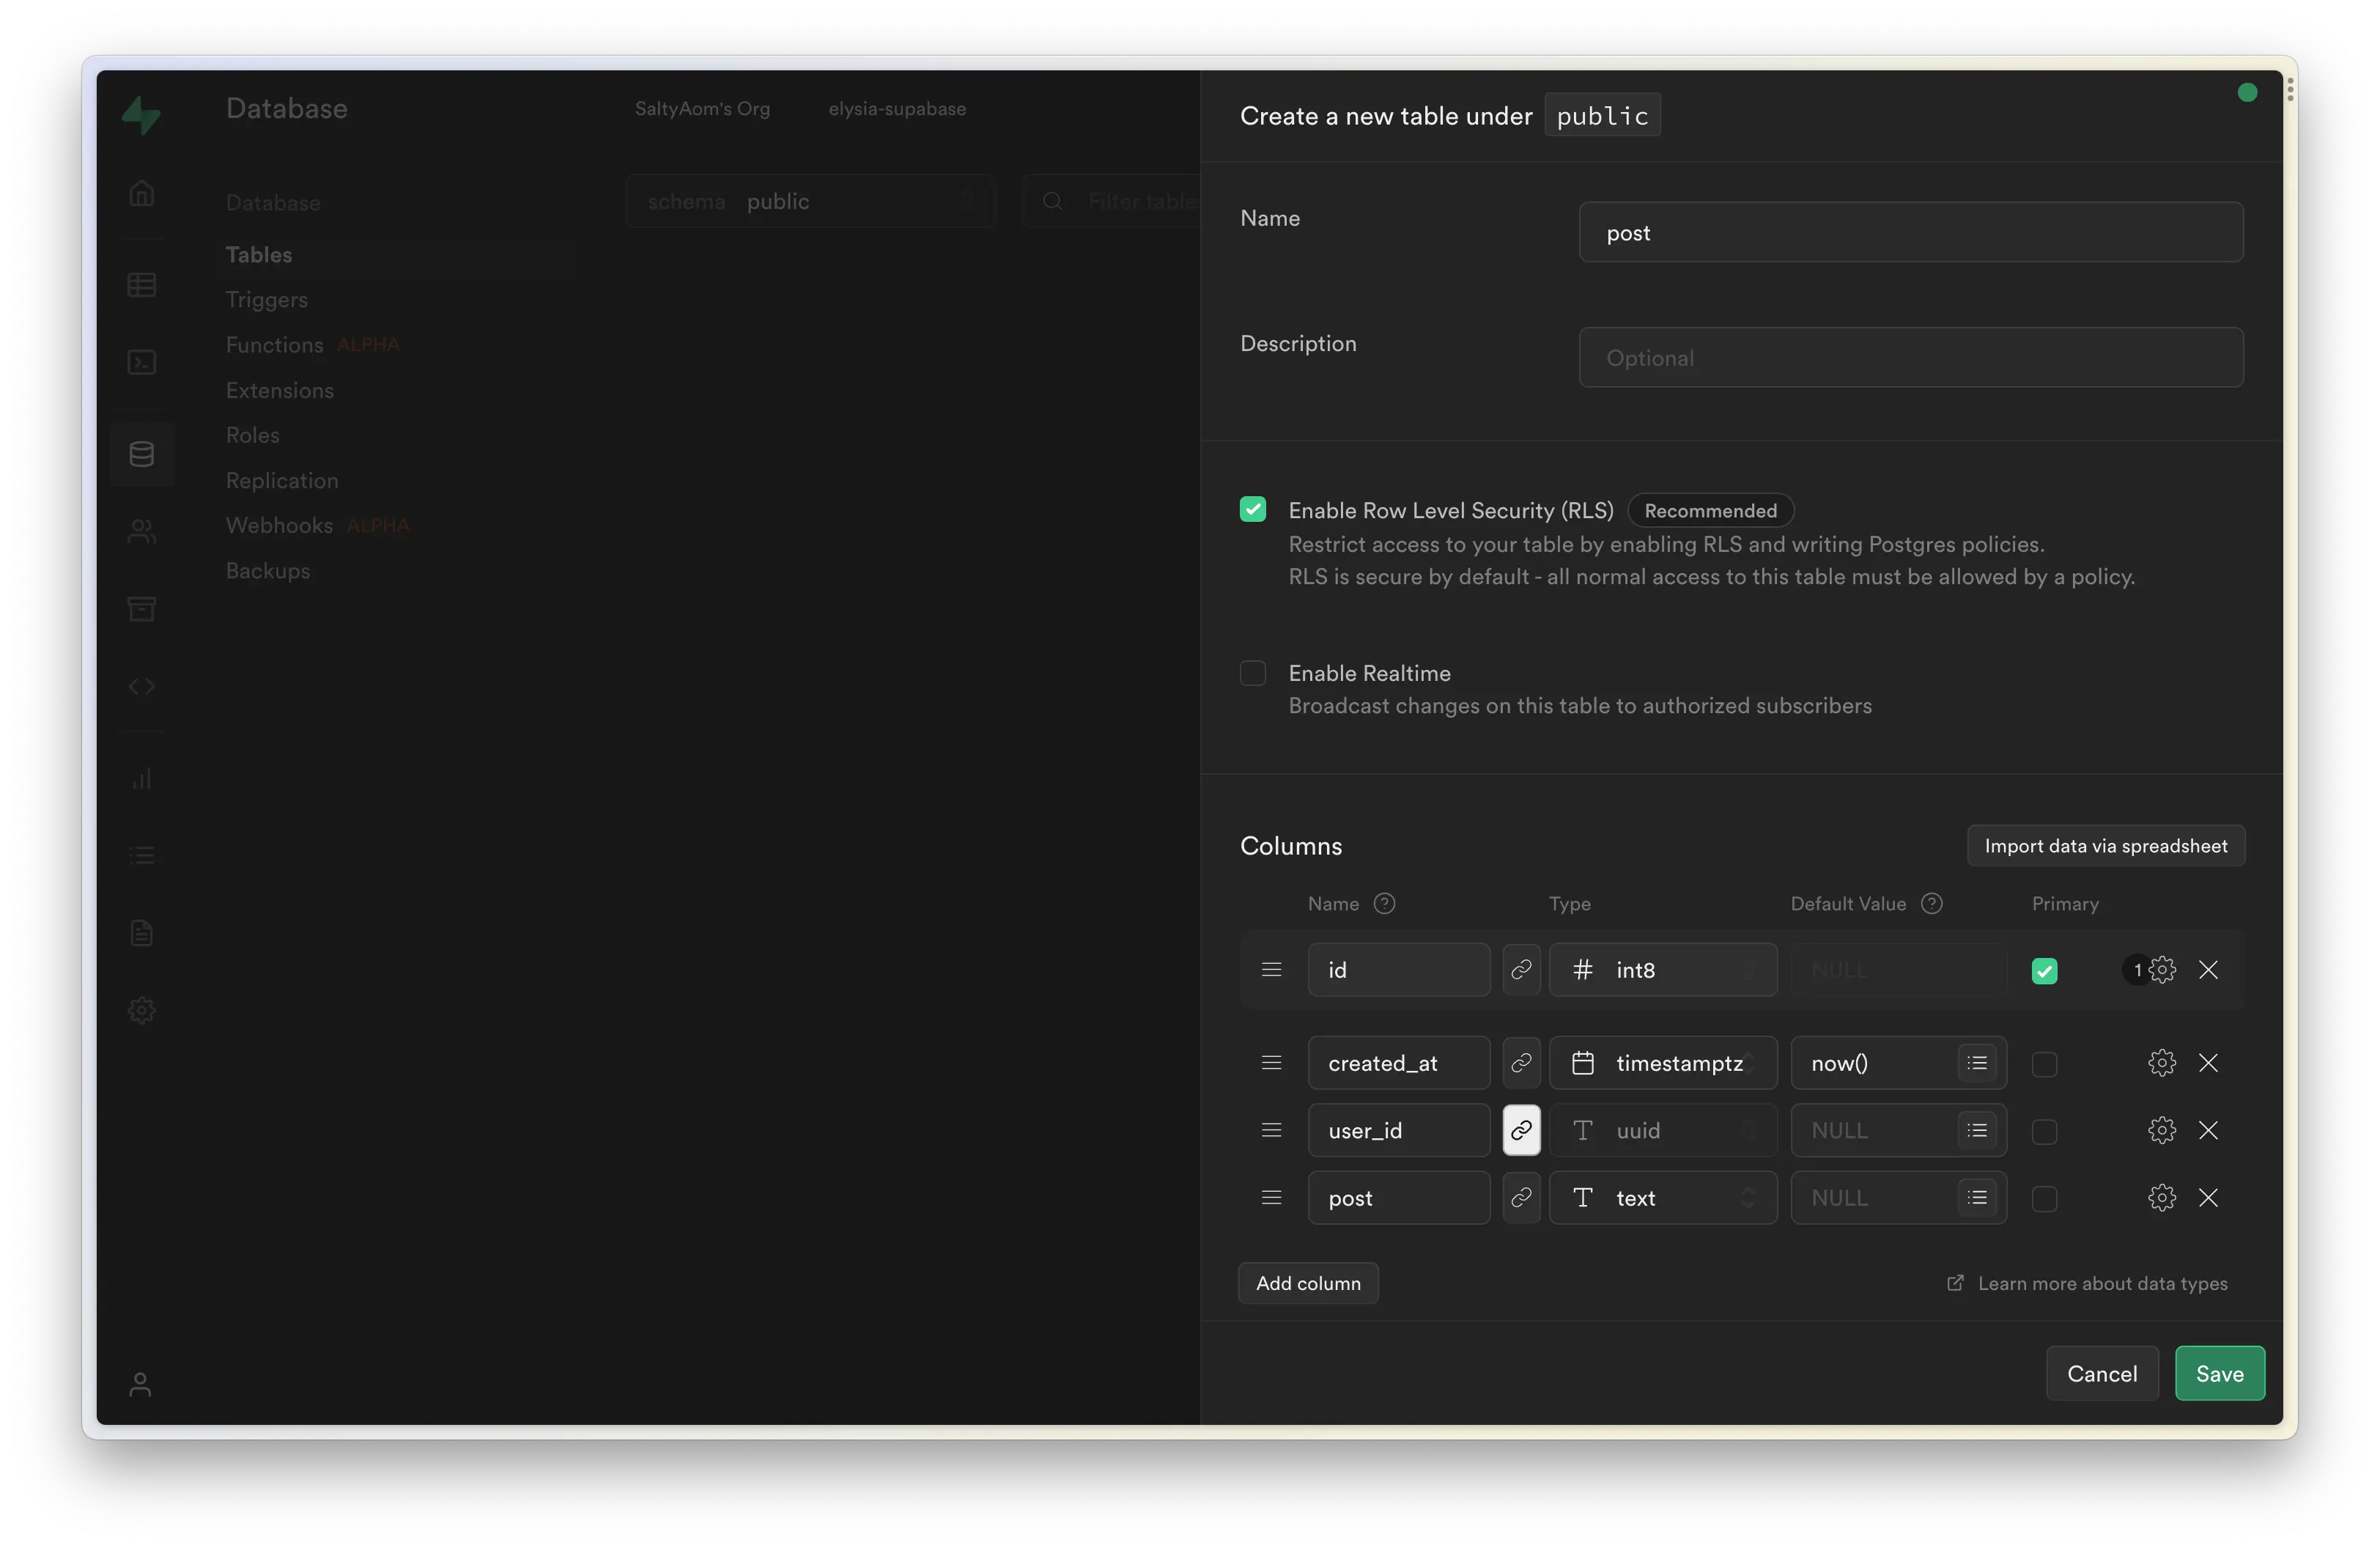
user_id is linked to Supabase's generated auth table linked as user.id, using this relation, we can create row-level security to only allow the owner of the post to modify the data.
Now, let's create a new separated Elysia route in another folder to separate the code from auth route, inside src/modules/post/index.ts
// src/modules/post/index.ts
import { Elysia, t } from 'elysia'
import { supabase } from '../../libs'
export const post = (app: Elysia) =>
app.group('/post', (app) =>
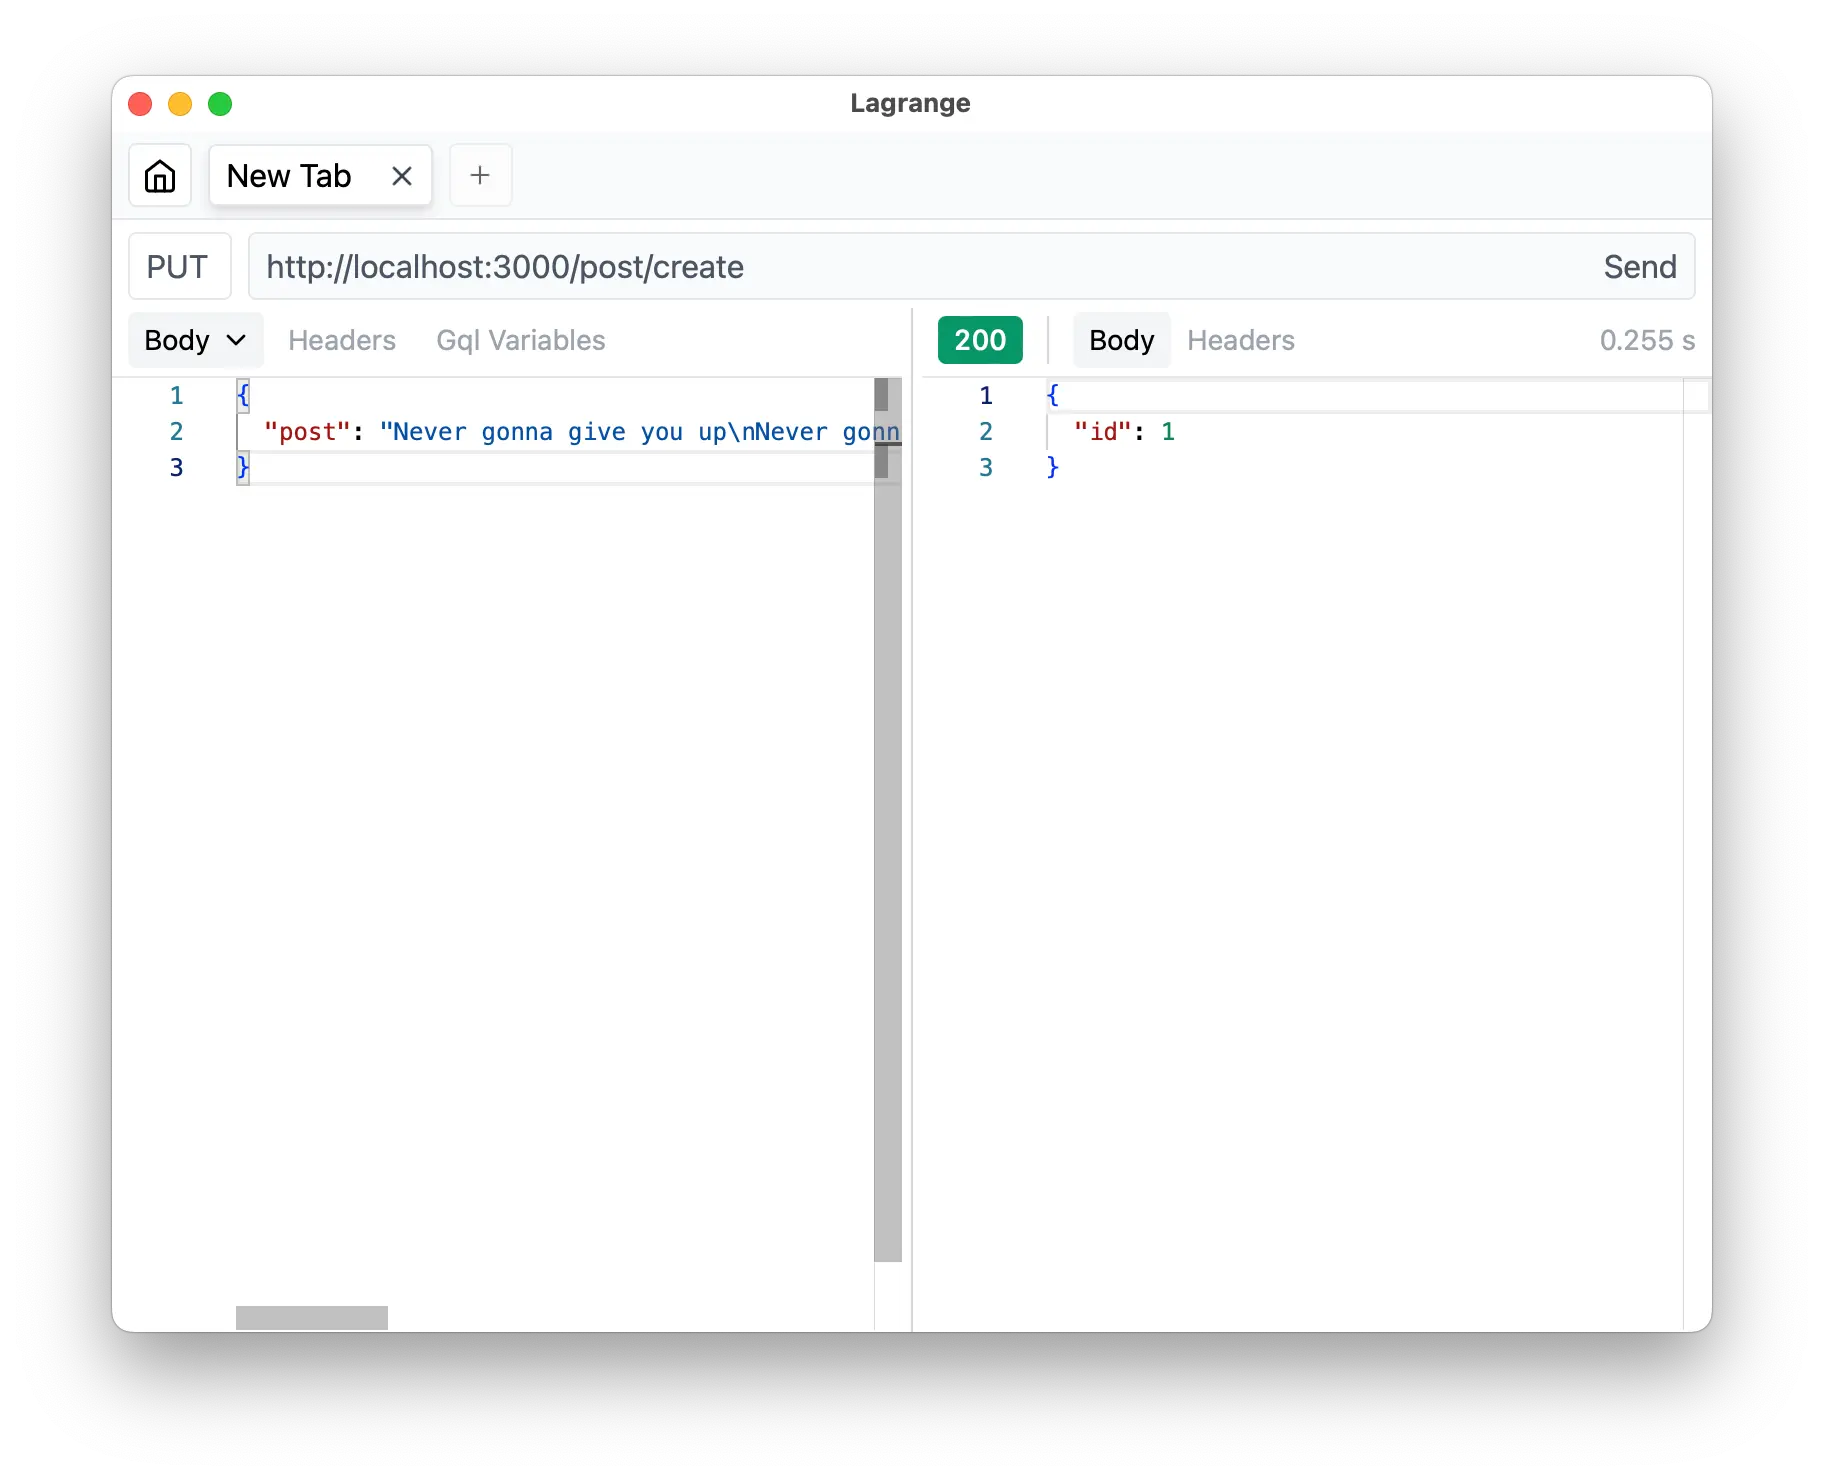
app.put(
'/create',
async ({ body }) => {
const { data, error } = await supabase
.from('post')
.insert({
// Add user_id somehow
// user_id: userId,
...body
})
.select('id')
if (error) throw error
return data[0]
},
{
schema: {
body: t.Object({
detail: t.String()
})
}
}
)
)Now, this route can accept the body and put it into the database, the only thing we are left to do is handle authorization and extract the user_id.
Luckily we can do that easily, thanks to Supabase, and our cookies.
import { Elysia, t } from 'elysia'
import { cookie } from '@elysiajs/cookie'

import { supabase } from '../../libs'

export const post = (app: Elysia) =>
    app.group('/post', (app) =>
        app.put(
            '/create',
            async ({ body }) => {
                let userId: string
                const { data, error } = await supabase.auth.getUser(
                    access_token
                )
                if(error) {
                    const { data, error } = await supabase.auth.refreshSession({
                        refresh_token
                    })
                    if (error) throw error
                    userId = data.user!.id
                }

                const { data, error } = await supabase
                    .from('post')
                    .insert({
                        // Add user_id somehow
                        // user_id: userId,
                        ...body
                    })
                    .select('id')

                if (error) throw error

                return data[0]
            },
            {
                schema: {
                    body: t.Object({
                        detail: t.String()
                    })
                }
            }
        )
    )
Great! Now we can extract user_id from our cookie using supabase.auth.getUser
Derive
Our code work fine for now, but let's paint a little picture.
Let's say you have so many routes that require authorization like this, requiring you to extract the userId, it means that you will have a lot of duplicated code here, right?
Luckily, Elysia is specially designed to tackle this problem.
In Elysia, we have something called a scope.
Imagine it's like a closure where only a variable can only be used inside a scope, or ownership if you're from Rust.
Any life-cycle declared in scope like group, guard is going to be only available in scope.
This means that you can declare a specific life cycle to specific routes inside the scope.
For example, a scope of routes that need authorization while others are not.
So, instead of reusing all that code, we defined it once and applied it to all the routes you need.
Now, let's move this retrieving user_id into a plugin and apply it to all routes in the scope.
Let's put this plugin inside src/libs/authen.ts
import { Elysia } from 'elysia'
import { cookie } from '@elysiajs/cookie'

import { supabase } from './supabase'

export const authen = (app: Elysia) =>
    app
        .use(cookie())
        .derive(
            async ({ setCookie, cookie: { access_token, refresh_token } }) => {
                const { data, error } = await supabase.auth.getUser(
                    access_token
                )

                if (data.user)
                    return {
                        userId: data.user.id
                    }

                const { data: refreshed, error: refreshError } =
                    await supabase.auth.refreshSession({
                        refresh_token
                    })

                if (refreshError) throw error

                return {
                    userId: refreshed.user!.id
                }
            }
        )
This code attempts to extract userId, and add userId to Context of the route, otherwise, it will throw an error and skip the handler, preventing an invalid error to be put into our business logic, aka supabase.from.insert.
TIP
We can also use onBeforeHandle to create a custom validation before entering the main handler too, .derive also does the same but any returned from derived will be added to Context while onBeforeHandle don't.
Technically, derive use transform under the hood.
And with a single line, we apply all routes inside the scope into authorized-only routes, with type-safe access to userId.
import { Elysia, t } from 'elysia'

import { authen, supabase } from '../../libs'

export const post = (app: Elysia) =>
    app.group('/post', (app) =>
        app
            .use(authen)
            .put(
                '/create',
                async ({ body, userId }) => {
                    let userId: string
                    const { data, error } = await supabase.auth.getUser(
                        access_token
                    )
                    if(error) {
                        const { data, error } = await supabase.auth.refreshSession({
                            refresh_token
                        })
                        if (error) throw error
                        userId = data.user!.id
                    }

                    const { data, error } = await supabase
                        .from('post')
                        .insert({
                            user_id: userId,
                            ...body
                        })
                        .select('id')

                    if (error) throw error

                    return data[0]
                },
                {
                    schema: {
                        body: t.Object({
                            detail: t.String()
                        })
                    }
                }
            )
    )
Great right? We don't even see that we handled the authorization by looking at the code like magic.
Putting our focus back on our core business logic instead.
Non-authorized scope
Now let's create one more route to fetch the post from the database.
import { Elysia, t } from 'elysia'

import { authen, supabase } from '../../libs'

export const post = (app: Elysia) =>
    app.group('/post', (app) =>
        app
            .get('/:id', async ({ params: { id } }) => {
                const { data, error } = await supabase
                    .from('post')
                    .select()
                    .eq('id', id)
                if (error) return error
                return {
                    success: !!data[0],
                    data: data[0] ?? null
                }
            })
            .use(authen)
            .put(
                '/create',
                async ({ body, userId }) => {
                    const { data, error } = await supabase
                        .from('post')
                        .insert({
                            // Add user_id somehow
                            // user_id: userId,
                            ...body
                        })
                        .select('id')

                    if (error) throw error

                    return data[0]
                },
                {
                    schema: {
                        body: t.Object({
                            detail: t.String()
                        })
                    }
                }
            )
    )
We are using success to indicate if the post is existed or not. 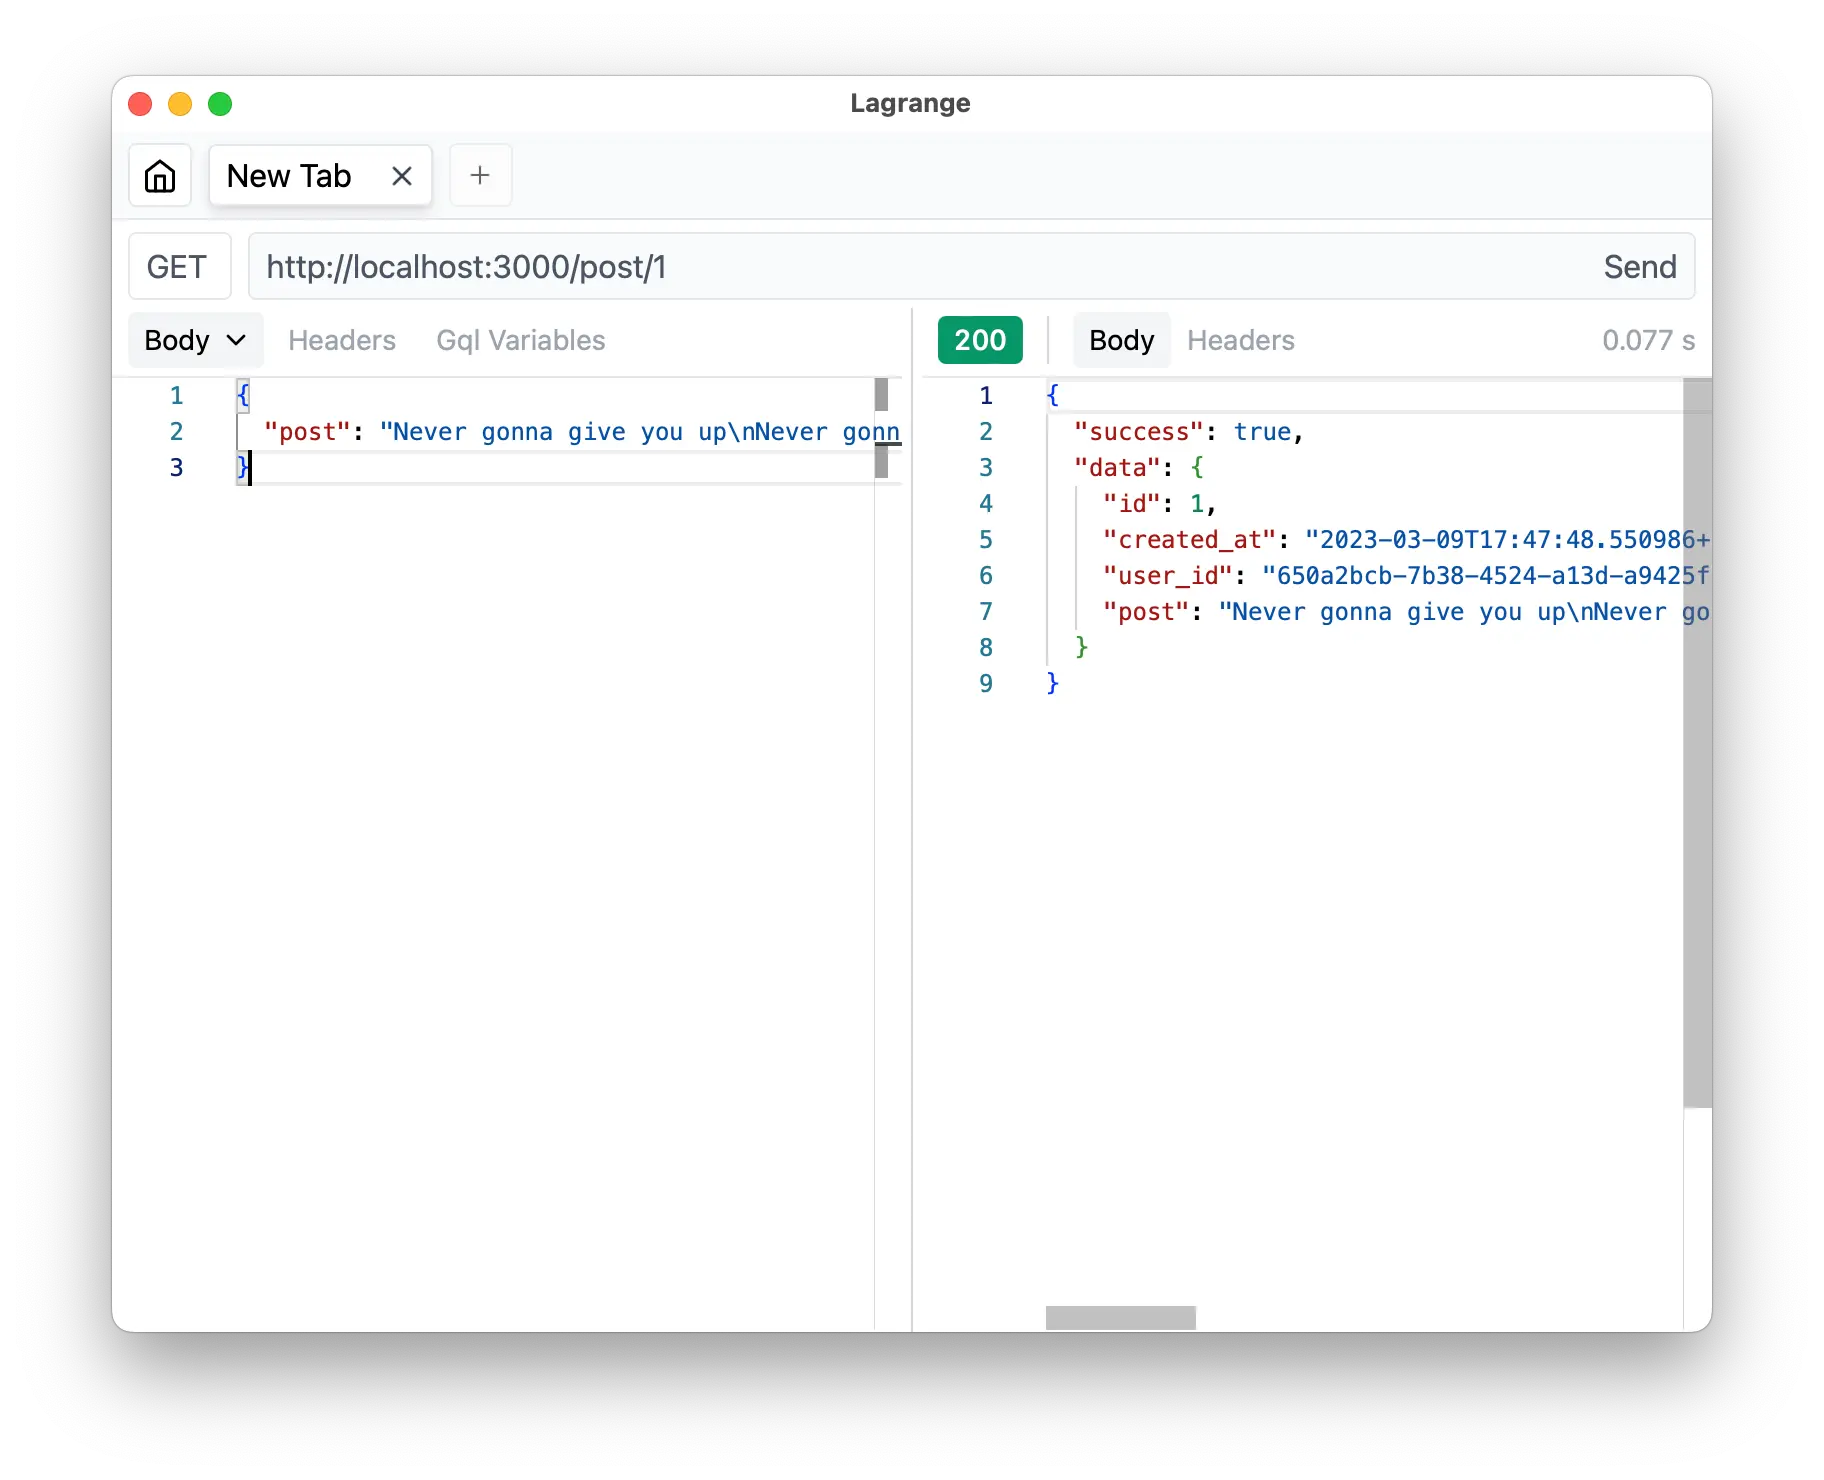
If not, we are going to return success: false and data: null instead. 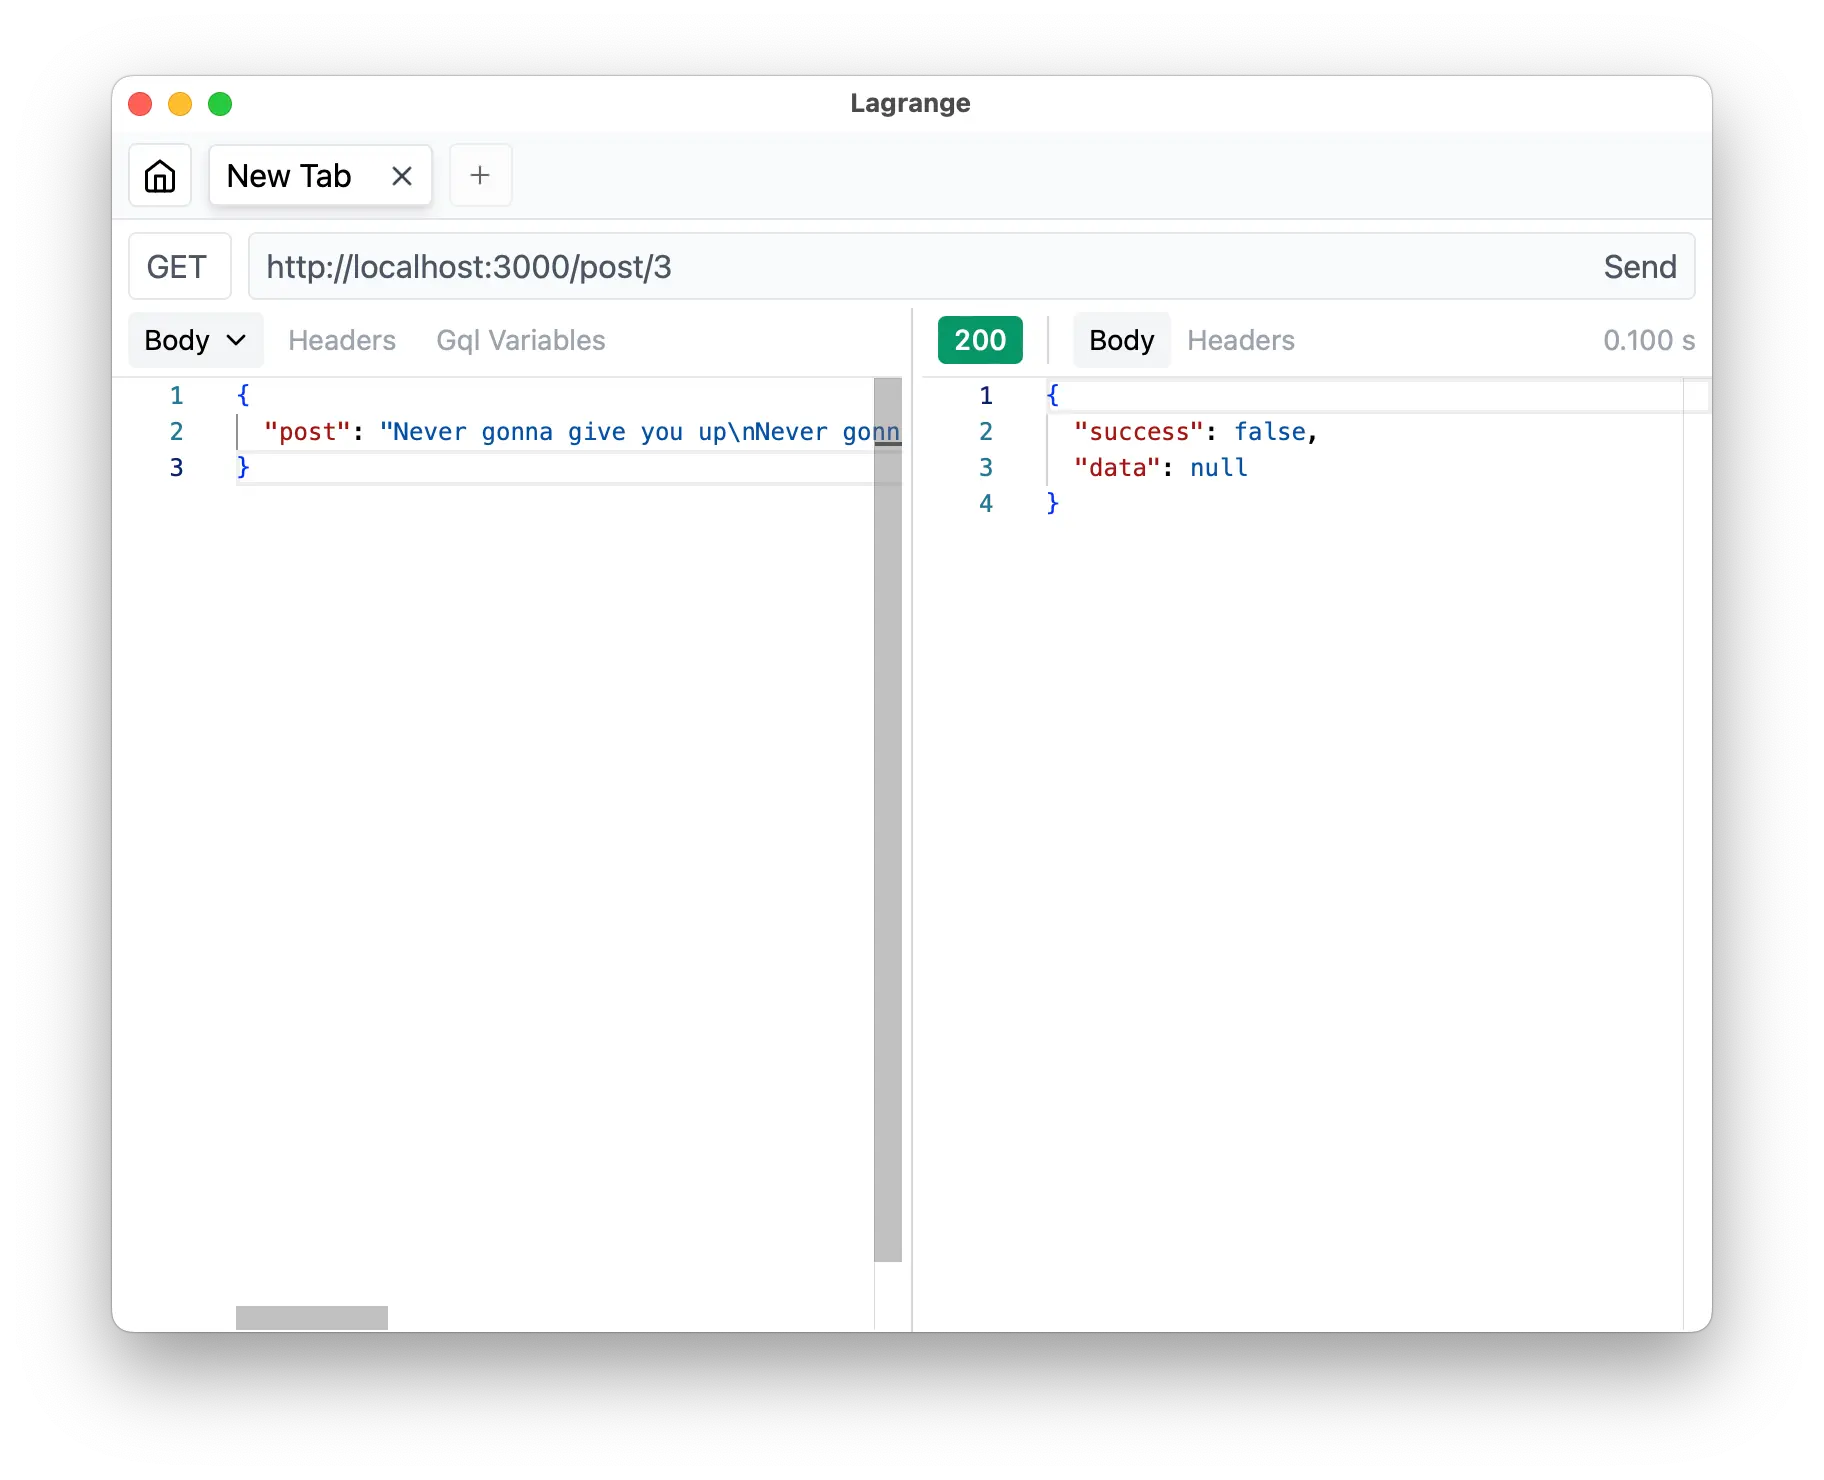
As we mentioned before, the .use(authen) is applied to the scoped but with only the one declared after itself, which means that anything before isn't affected, and what came after is now authorized only route.
And one last thing, don't forget to add routes to the main server.
import { Elysia, t } from 'elysia'

import { auth, post } from './modules'

const app = new Elysia()
    .use(auth)
    .use(post)
    .listen(3000)

console.log(
    `🦊 Elysia is running at ${app.server?.hostname}:${app.server?.port}`
)
Bonus: Documentation
As a bonus, after all of what we create, instead of telling exactly route by route, we can create documentation for our frontend devs in 1 line.
With the Swagger plugin, we can install:
bun add @elysiajs/swagger@rcAnd then just add the plugin:
import { Elysia, t } from 'elysia'
import { swagger } from '@elysiajs/swagger'

import { auth, post } from './modules'

const app = new Elysia()
    .use(swagger())
    .use(auth)
    .use(post)
    .listen(3000)

console.log(
    `🦊 Elysia is running at ${app.server?.hostname}:${app.server?.port}`
)
Tada 🎉 We got well-defined documentation for our API.
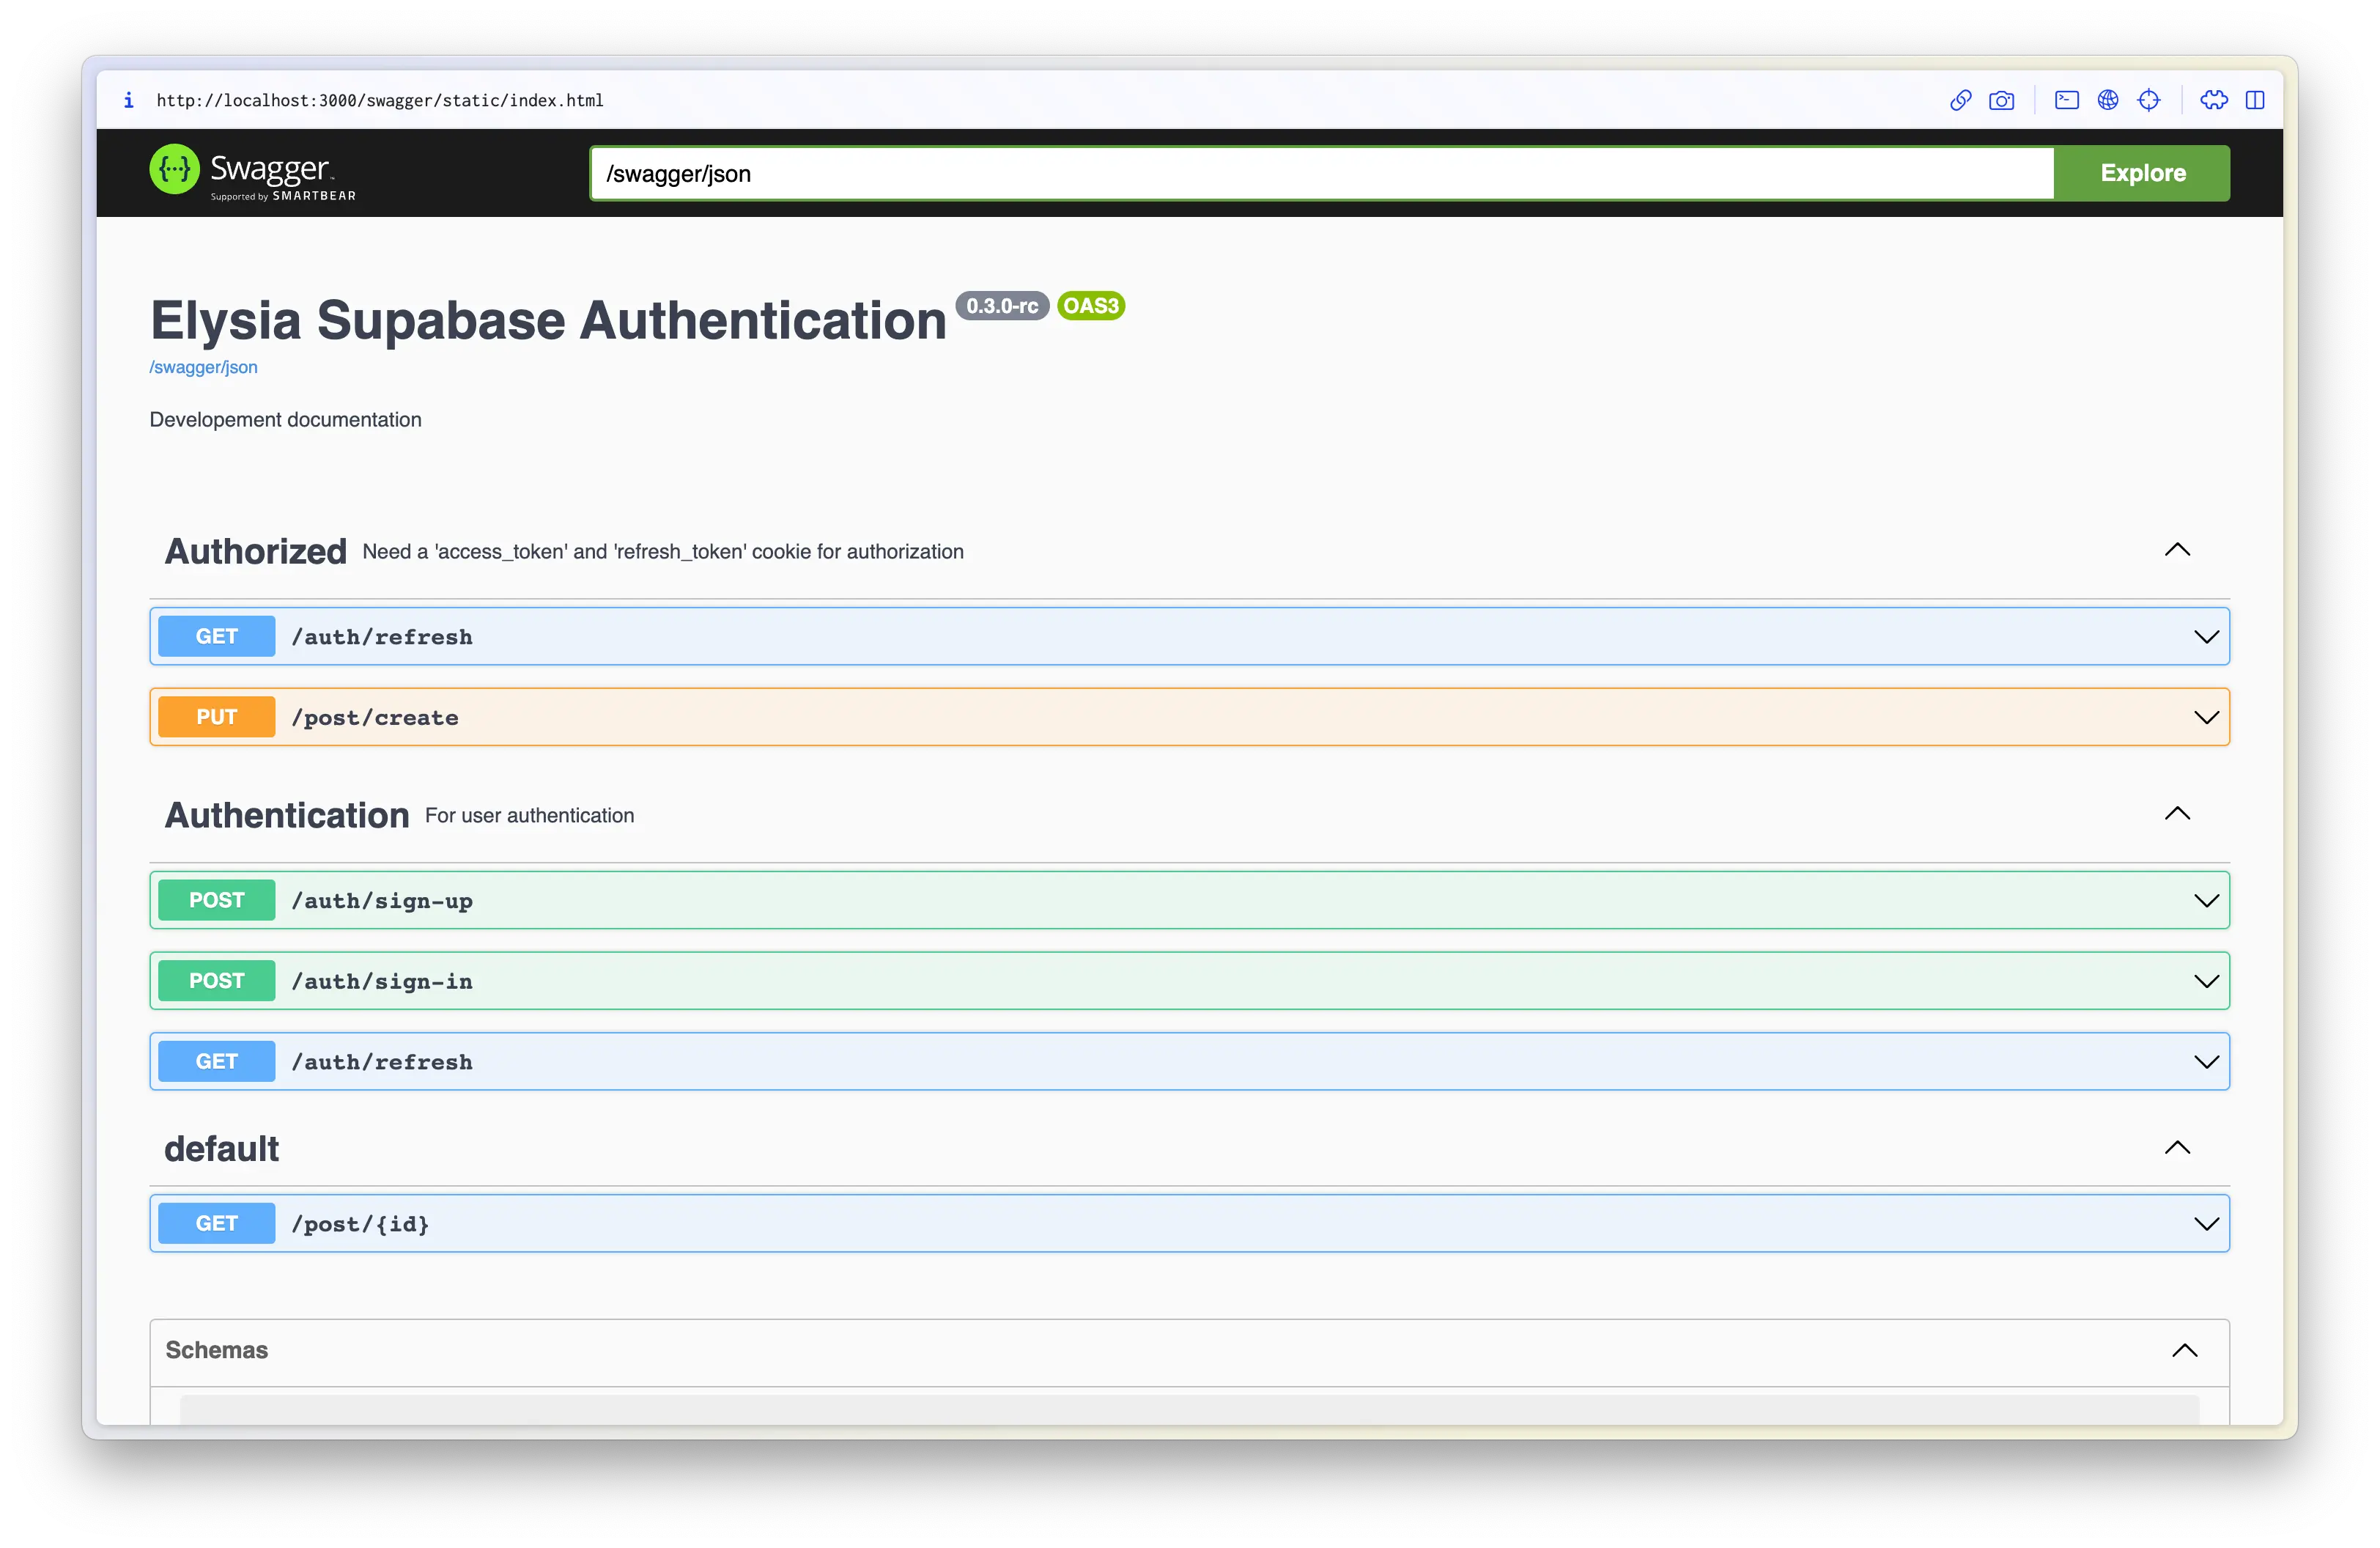
And if anything more, you don't have to worry that you might forget a specification of OpenAPI Schema 3.0, we have auto-completion and type-safety too.
We can define our route detail with schema.detail that also follows OpenAPI Schema 3.0, so you can properly create documentation. 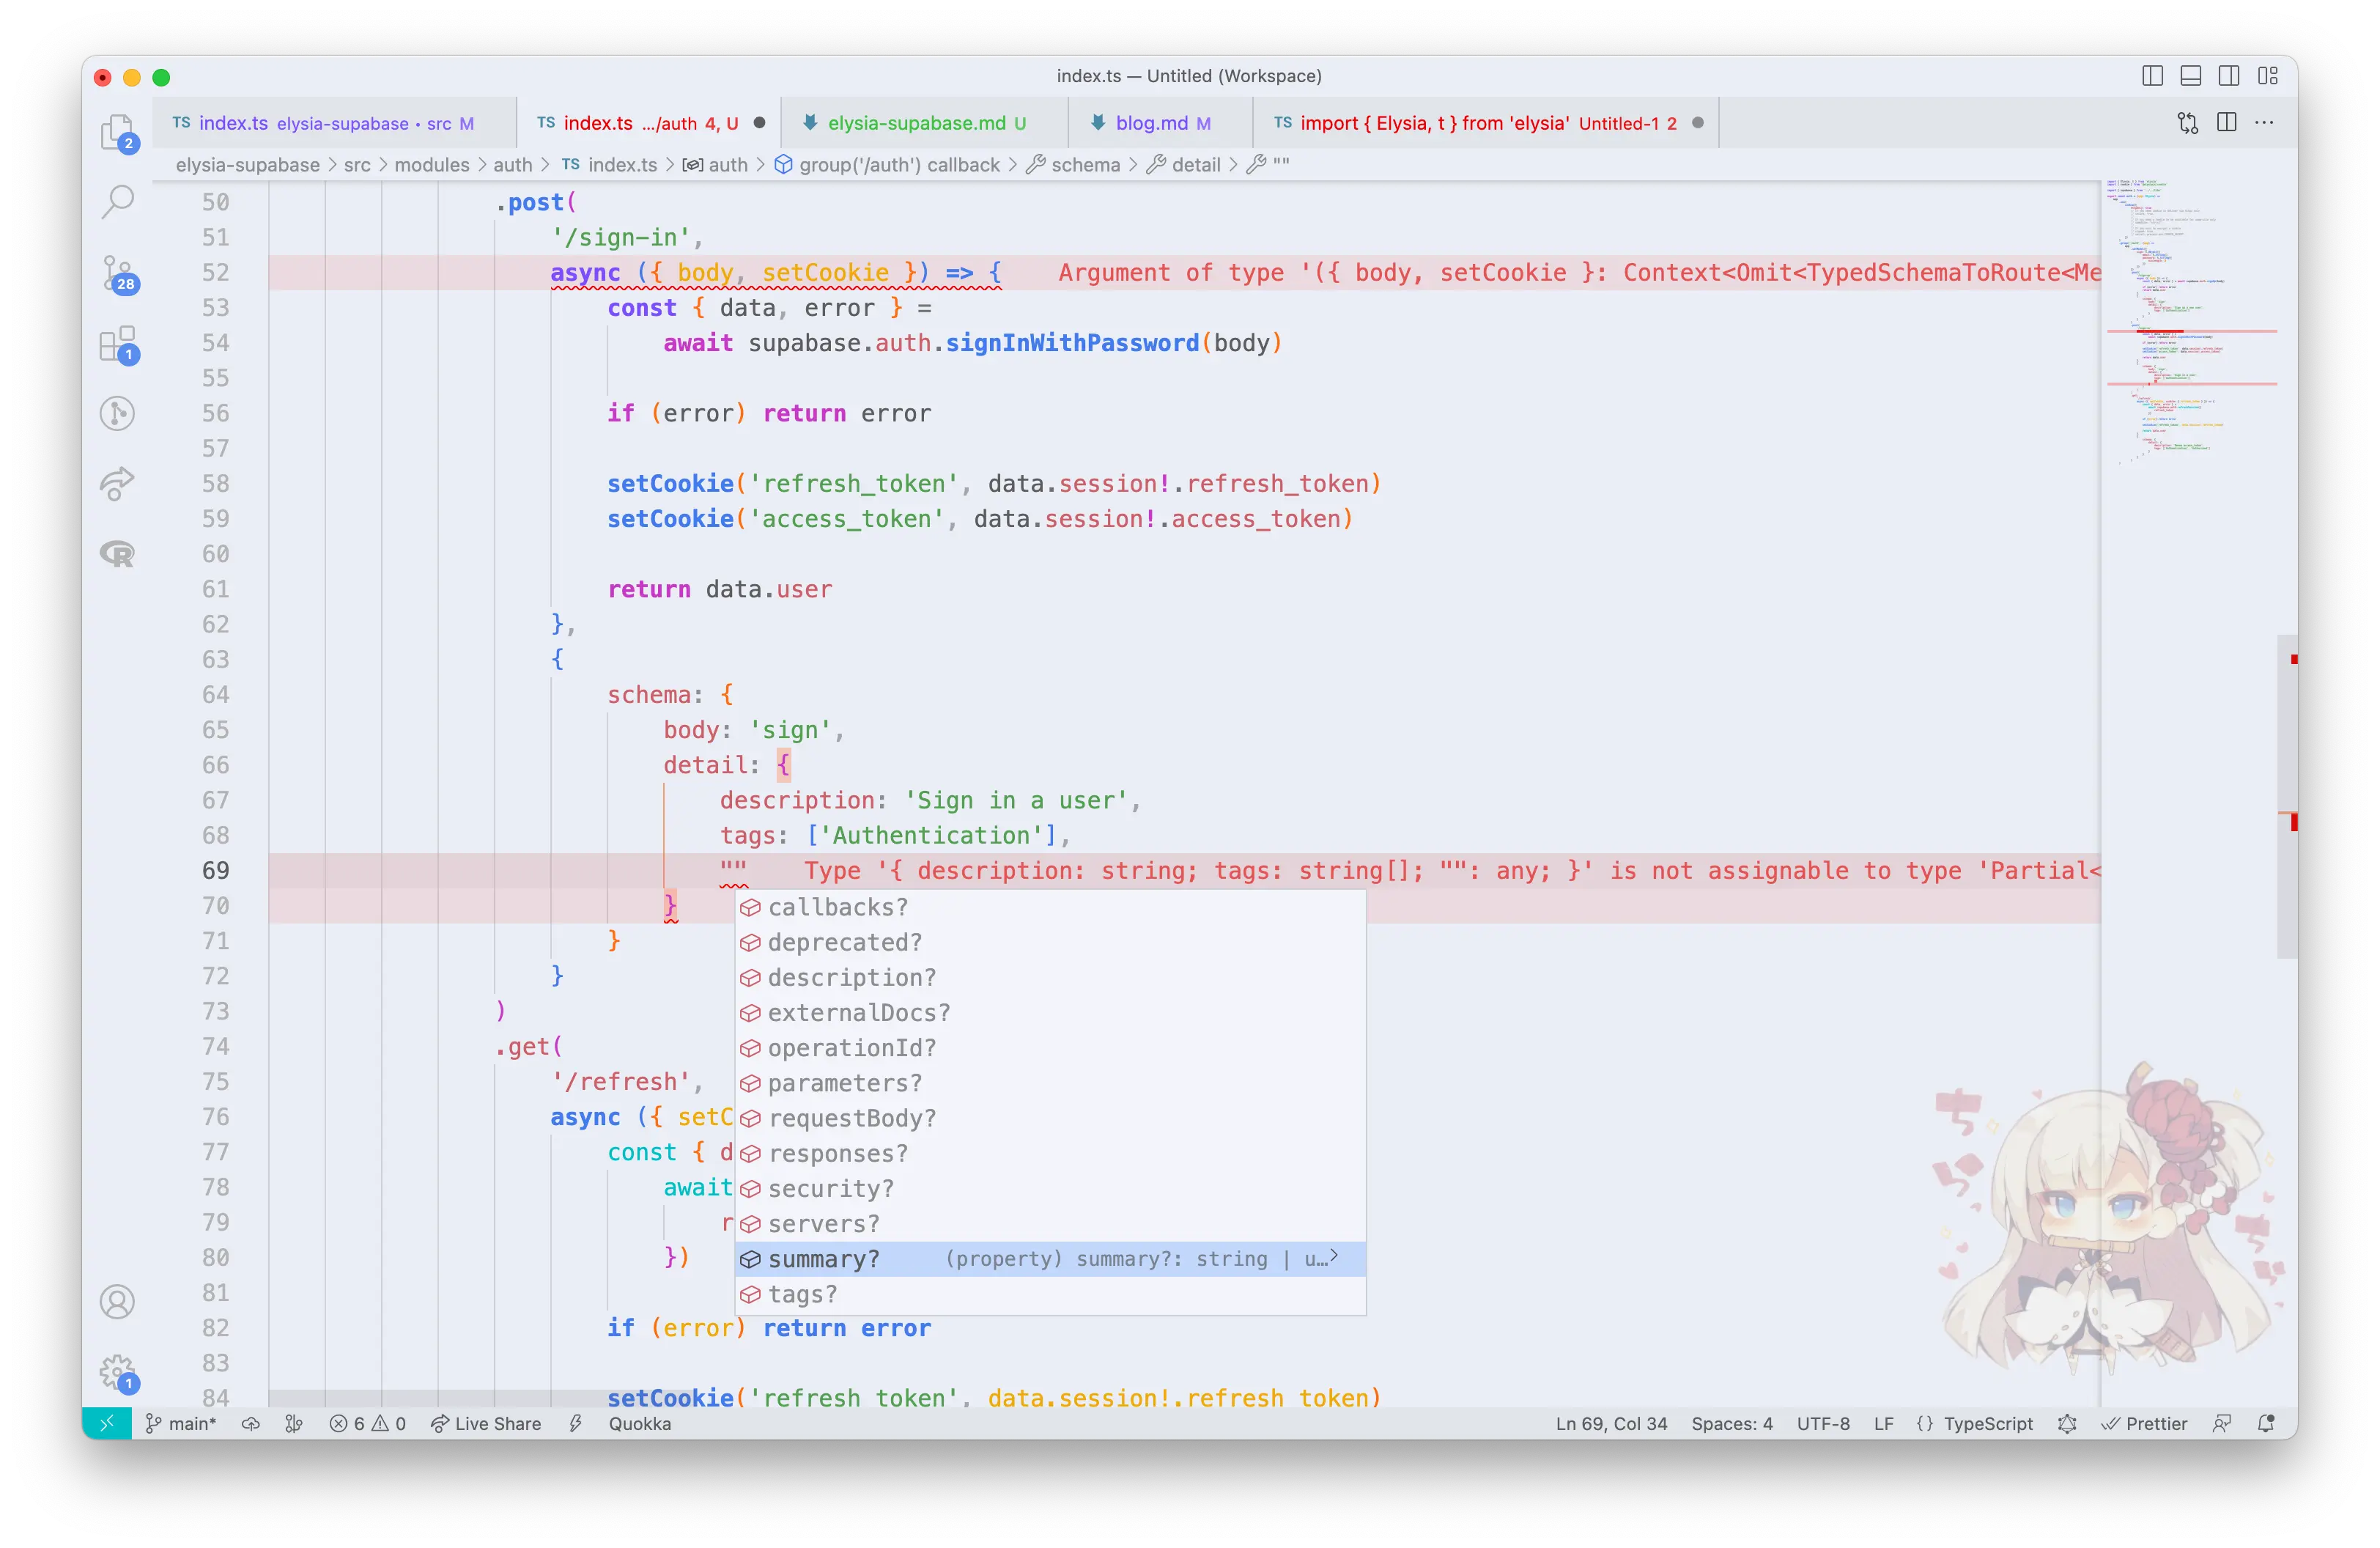
What's next
For the next step, we encourage you to try out and explore more with the code we have just written in this article and try adding an image-uploading post, to see explore both Supabase and Elysia ecosystems.
As we can see, it's super easy to create a production-ready web server with Supabase, many things are just one-liners and handy for rapid development.
Especially when paired with Elysia, you get excellent Developer Experience, declarative schema as a single source of truth, and a very well-thought design choice for creating an API, high-performance server while using TypeScript, and as a bonus, we can create documentation in just one line.
Elysia is on a journey for creating a Bun-first web framework with new technology, and a new approach.
If you're interested in Elysia, feel free to check out our Discord server or see Elysia on GitHub
Also, you might want to checkout out Elysia Eden, a fully type-safe, no-code-gen fetch client like tRPC for Elysia server.